My nephew, Leo, asked me last year why I couldn’t just use a straw to poke the holes in the boiled eggs. I started to explain why that wouldn’t work — then stopped. Honestly, I had no good reason. I’d been carefully using a thumbtack for years, always worrying I’d snap the tip off inside the shell. Leo, who was eight at the time, just shrugged and grabbed a clean plastic straw from his juice box. I watched him press it gently into the wide end of an egg, and the shell cracked in a perfect little circle. I felt my whole approach to egg prep shift in that moment. It was one of those tiny kitchen victories that made me realize how often I overcomplicate things. That same night, we were making these spooky monster eyeball deviled eggs for Halloween, and his little trick saved us so much time. The eggs came out looking like actual eyeballs — creepy, veiny, and perfect for a Halloween party platter. I mean, who knew a juice box straw could be the secret weapon for Halloween appetizers? Maybe you’ve been there — stuck in a cooking rut, doing things the hard way, until a kid shows you a better method. That’s the story behind these eggs. They’re fun, they’re freaky, and they always steal the show at any spooky gathering.
Why You’ll Love This Recipe
These spooky monster eyeball deviled eggs are the kind of Halloween appetizer that gets people talking. I’ve tested this recipe at three different Halloween parties now, and every single time, someone asks for the recipe before they even finish eating one. Here’s why this version stands out from the dozen other deviled egg recipes out there.
- Quick & Easy : Comes together in under 30 minutes, perfect for last-minute Halloween party prep or a fun afternoon activity with kids.
- Simple Ingredients : No fancy grocery trips needed. You likely already have eggs, mayo, mustard, and paprika in your kitchen right now.
- Perfect for Halloween : Great for spooky buffets, potlucks, classroom parties, or just a creepy snack while watching horror movies.
- Crowd-Pleaser : Always gets rave reviews from kids and adults alike. Even people who “don’t like deviled eggs” end up grabbing two.
- Unbelievably Delicious : The creamy filling combined with the briny olive “pupil” creates a texture and flavor combo that’s next-level comfort food.
What makes these different from the rest? It’s the little details — using black olives for the pupils instead of something artificial, adding a splash of pickle juice to the filling for extra tang, and that trick with the straw Leo taught me for perfect holes. This isn’t just another deviled egg recipe. It’s the one that’ll have your guests saying, “Wait, these are deviled eggs?”
This recipe is the kind that makes you smile after the first bite. It’s Halloween food reimagined — spooky on the outside, delicious on the inside, with the same soul-soothing satisfaction as the classic version your grandma used to make.
What Ingredients You Will Need
This recipe uses simple, wholesome ingredients to deliver bold flavor and satisfying texture without the fuss. Most of these are pantry staples, but a few special touches make all the difference.
- 12 large eggs (room temperature works best for even cooking)
- 1/3 cup mayonnaise (I prefer Hellmann’s or Duke’s for creaminess)
- 1 tablespoon yellow mustard (or Dijon for a sharper kick)
- 1 teaspoon white vinegar (adds brightness and helps the filling stay smooth)
- 1/2 teaspoon salt
- 1/4 teaspoon black pepper
- 1/2 teaspoon paprika (plus extra for garnish)
- 1 tablespoon pickle juice (optional but highly recommended — adds tang and depth)
- 1 can (6 oz) large black olives (for the monster eyeball pupils)
- Red food coloring (for the “bloodshot” veins — gel food coloring works best)
- 1 small beet (optional natural alternative for red coloring)
For the “bloodshot” effect, I’ve found that gel food coloring gives you more control than liquid drops. A tiny dab goes a long way. If you want to skip artificial colors entirely, boil a small beet until soft, then use the deep red cooking liquid to paint the veins. It takes a little more effort, but the natural color looks surprisingly authentic.
When selecting olives, look for the largest black olives you can find. The jumbo size works perfectly for eyeball pupils. I’ve tried using sliced olives, but they’re too thin and don’t create that creepy staring effect. Whole pitted olives are your best bet.
For the eggs, older eggs actually peel easier than fresh ones. If your eggs are super fresh from the farm, let them sit in the fridge for a week before boiling. Trust me on this one — I learned the hard way after destroying three perfect farm-fresh eggs in one peeling session.
Equipment Needed
You don’t need fancy equipment for this recipe, but a few specific tools make the process much smoother.
- Large pot (for boiling eggs — make sure it’s big enough that eggs aren’t crowded)
- Medium mixing bowl
- Fork or potato masher (for mashing the yolks)
- Piping bag or zip-top bag (for filling the eggs neatly)
- Small sharp knife (for slicing olives and painting veins)
- Clean plastic straw (for poking the hole — Leo’s trick!)
- Small paintbrush (a clean art brush or pastry brush for the bloodshot veins)
- Deviled egg tray or serving platter
If you don’t have a piping bag, a simple zip-top bag with the corner snipped off works perfectly. I’ve used that method for years and honestly prefer it to fancy piping tips. For the paintbrush, I bought a cheap pack of small art brushes from the dollar store and dedicated them to food use only. They work better than any pastry brush I’ve tried for detailed vein work.
Preparation Method
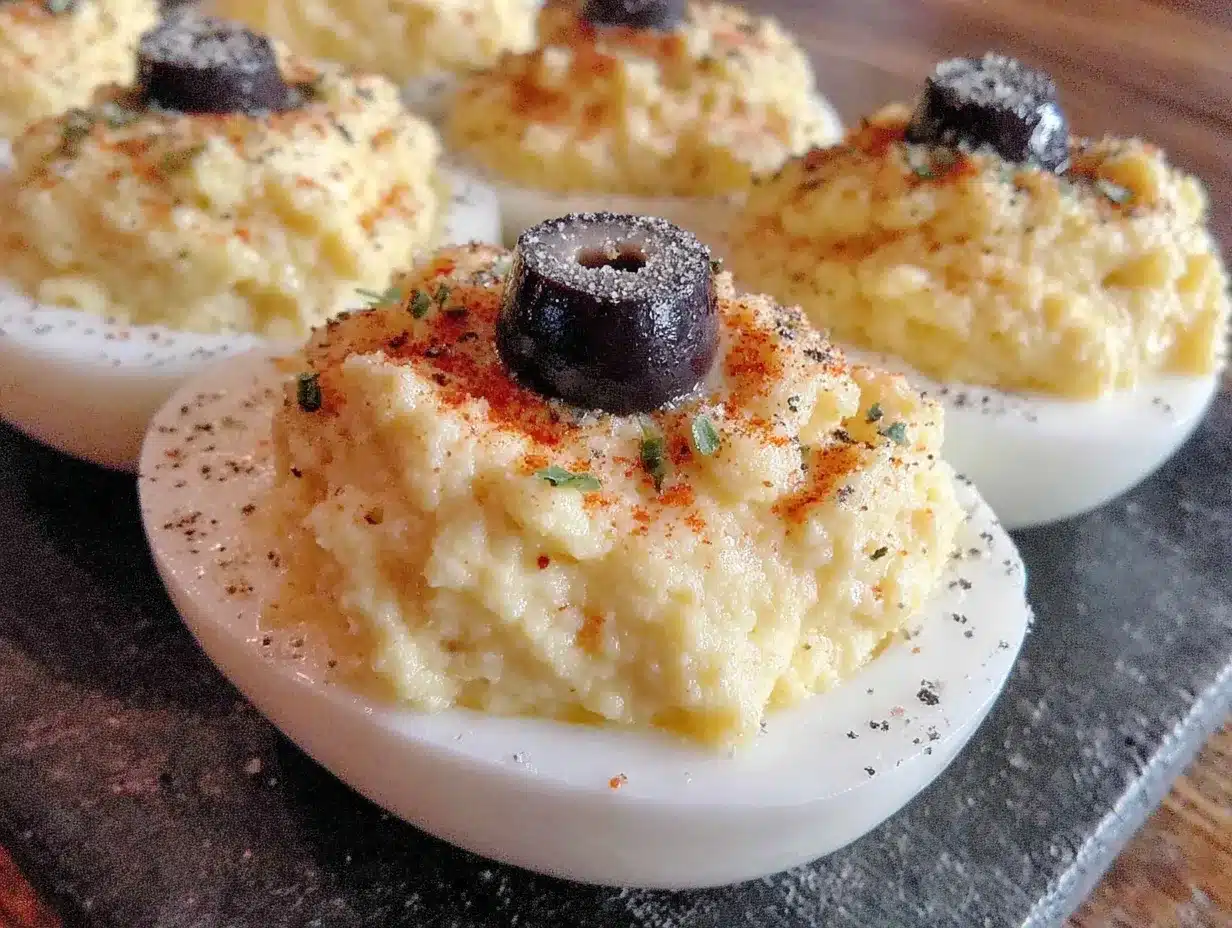
Let me walk you through this step by step. I’ve made these eggs more times than I can count, and these instructions will save you from the mistakes I’ve made along the way.
- Boil the eggs : Place the eggs in a single layer in your pot. Cover with cold water by about an inch. Bring to a rolling boil over high heat. Once boiling, cover the pot, turn off the heat, and let sit for exactly 12 minutes. Set a timer — don’t guess. While they sit, prepare an ice bath in a large bowl.
- Cool the eggs : Transfer the eggs to the ice bath using a slotted spoon. Let them sit for at least 10 minutes. This stops the cooking process and makes peeling much easier. I’ve rushed this step before, and the shells stuck like glue. Patience pays off here.
- Peel and prep : Gently tap each egg on the counter to crack the shell all over. Roll it between your palms to loosen the shell, then peel under running cold water. The water helps separate the shell from the egg white. Pat the peeled eggs dry with a paper towel.
- Create the “pupil hole” : This is where Leo’s trick comes in. Take a clean plastic straw and press it gently into the wide end of each egg, pushing about 1/4 inch deep. Twist slightly and pull out. You’ll have a perfect little circular indent. If the hole is too shallow, the olive won’t stay put. Too deep, and you’ll hit the yolk cavity. Aim for about 1/4 inch.
- Cut the eggs : Using a sharp knife, slice each egg in half lengthwise. Gently pop out the yolks into your mixing bowl. Place the egg white halves on your serving tray, hole-side up.
- Make the filling : Mash the yolks with a fork until they’re finely crumbled. Add the mayonnaise, mustard, vinegar, salt, pepper, and pickle juice. Mix until smooth and creamy. Taste and adjust seasoning — I usually add a pinch more salt at this point. The filling should be thick but spreadable.
- Fill the eggs : Spoon the filling into your piping bag or zip-top bag. Snip off the corner and pipe the filling into each egg white half, mounding it slightly above the edge. Don’t overfill, or the olive won’t sit properly. You want a nice rounded dome.
- Add the pupils : Drain the black olives and pat them dry. Cut each olive in half crosswise (not lengthwise). Place one olive half, cut-side down, into the hole you made earlier. Press gently so it stays in place. The olive should look like a creepy eyeball staring back at you.
- Create the bloodshot veins : Mix a tiny drop of red gel food coloring with a drop of water on a small plate. Using your clean paintbrush, paint thin lines radiating outward from the olive “pupil” across the white of the egg. Don’t overdo it — a few subtle veins look more realistic than a giant red blob. If using beet juice, just dip the brush in the red liquid and paint directly.
- Garnish and serve : Sprinkle a tiny pinch of paprika over the filling (not the olive) for extra color. Arrange on your platter and watch them disappear.
Cooking Tips & Techniques
I’ve made plenty of mistakes with deviled eggs over the years, so let me share what I’ve learned the hard way.
The perfect hard-boiled egg is all about timing. Twelve minutes of resting in hot water gives you a fully set yolk with no green ring. That green ring happens when eggs cook too long or cool too slowly. If you see green, your eggs are overcooked. The ice bath stops the cooking immediately, so don’t skip it.
Peeling frustration is real. If you’re struggling, try adding a teaspoon of baking soda to the boiling water. It raises the pH and makes shells easier to remove. I also learned that starting the peel at the wide end (where the air pocket is) gives you an easier entry point. Once you get under the membrane, the rest comes off smoothly.
For the filling, room temperature ingredients blend more smoothly than cold ones. If your mayo is straight from the fridge, let it sit out for 15 minutes before mixing. Also, don’t overmix the filling — you want it creamy, not gluey. A few small lumps are actually fine and add texture.
Timing strategy : Boil and peel the eggs the night before. Store them in the fridge in a covered container. The next day, just make the filling and assemble. This makes party prep so much less stressful. I’ve done it both ways, and the make-ahead method is a lifesaver.
Consistency tip : If your filling seems too dry, add mayo one teaspoon at a time until it reaches the right consistency. If it’s too wet, add a few more mashed yolks or a teaspoon of instant potato flakes. Yes, potato flakes — weird, but it works and doesn’t change the flavor.
Variations & Adaptations
One of the best things about this recipe is how easy it is to customize. Here are some variations I’ve tried and loved.
Dietary adaptations : For a dairy-free version, use vegan mayonnaise. For a lower-fat option, substitute half the mayo with plain Greek yogurt. The yogurt adds tang and creaminess while cutting calories. I’ve made it this way for a health-conscious friend’s party, and nobody noticed the difference.
Flavor variations : Add a pinch of cayenne pepper or smoked paprika to the filling for a spicy kick. Mix in finely chopped chives or fresh dill for an herby twist. For a Southern-style version, add a teaspoon of sweet pickle relish to the filling. My aunt makes them this way, and they’re always the first to disappear.
Color variations : Instead of red veins, try green for a zombie theme. Use a drop of green food coloring mixed with water. Or skip the veins entirely and just use the olive pupils for a simpler but still spooky look. I’ve also seen people use sliced green olives with pimentos for a different eyeball effect.
Method variations : If you don’t want to boil eggs, you can use an egg cooker or even bake them in the oven. To bake, place eggs in a muffin tin and bake at 325°F for 25 minutes, then transfer to ice water. The texture is slightly different but still works great for deviled eggs.
Personal variation : Last Halloween, I added a tiny dot of sriracha to the center of each olive pupil before placing it in the egg. It gave each bite a little heat surprise. My brother-in-law ate six before he even noticed the spice. Sometimes the best variations come from just playing around in the kitchen.
Serving & Storage Suggestions
These spooky monster eyeball deviled eggs are best served chilled, right from the refrigerator. The cold temperature keeps the filling firm and the olives fresh. Arrange them on a black platter or a dark-colored serving tray to make the “eyeballs” pop visually. A bed of fresh parsley or kale around the edges adds a nice contrast and looks like creepy foliage.
For a full Halloween spread, these pair wonderfully with other spooky appetizers like mummy hot dogs, pumpkin-shaped cheese balls, or ghost-shaped cookies. For beverages, a dark punch or sparkling cider with dry ice effect (using a fog machine, not real dry ice in drinks) completes the theme. I served them alongside a bowl of “witches’ brew” soup last year, and the combination was a hit.
Storage instructions : Store leftover deviled eggs in an airtight container in the refrigerator for up to 2 days. Place them in a single layer, and if stacking is necessary, put a layer of wax paper between tiers. The eggs will keep their shape and flavor, though the “bloodshot” veins may fade slightly over time.
Reheating : These are meant to be served cold, so no reheating needed. If you’ve refrigerated them for more than a few hours, let them sit at room temperature for about 10 minutes before serving to take the chill off. This brings out the flavors better.
Flavor development : Interestingly, the flavors actually meld together and improve after a few hours in the fridge. The pickle juice and mustard infuse the filling more deeply, and the olives absorb a bit of moisture, making them plumper. I actually prefer the taste of day-old deviled eggs for this reason.
Nutritional Information & Benefits
Here’s the estimated nutritional breakdown for one deviled egg half (based on 24 servings from 12 eggs):
- Calories : Approximately 65-70 calories per piece
- Protein : 5-6 grams
- Fat : 4-5 grams
- Carbohydrates : 1-2 grams
- Sodium : 120-150 mg
Eggs are a fantastic source of high-quality protein and contain all nine essential amino acids. They’re also rich in choline, which supports brain health, and lutein, which is good for eye health — fitting for an eyeball-themed recipe! The black olives add healthy monounsaturated fats and a small amount of iron.
Dietary considerations : This recipe is naturally gluten-free and low-carb, making it suitable for keto and paleo diets. It contains eggs and mayonnaise (which typically contains eggs), so it’s not suitable for those with egg allergies. For a vegan version, you’d need to use a completely different base, like stuffed mini bell peppers with a similar filling.
From a wellness perspective, I love that these deviled eggs are a protein-packed appetizer that doesn’t leave you feeling heavy. They’re satisfying enough to take the edge off hunger before the main meal but light enough that you don’t feel guilty having a few. Halloween treats don’t have to be all candy and sugar!
FAQs
Can I make these spooky monster eyeball deviled eggs ahead of time?
Yes! You can boil and peel the eggs up to 2 days in advance. Store them in the refrigerator in a covered container. Assemble the filling and decorate the eggs on the day you plan to serve them for the freshest appearance. The “bloodshot” veins tend to fade if made too far ahead.
How do I prevent the olive pupils from falling out?
Make sure the hole you create with the straw is deep enough — about 1/4 inch. Also, press the olive half firmly into the hole. If the olive is too large, trim a tiny slice off the bottom to create a flat surface. A dab of filling in the hole before adding the olive can also help hold it in place.
Can I use a different type of olive?
Absolutely. While large black olives give the most realistic “eyeball” look, you can use green olives with pimentos for a different effect. Kalamata olives will work too, but they’re softer and may not hold their shape as well. Avoid sliced olives — they’re too thin to create the pupil effect.
What if I don’t have a piping bag for the filling?
No problem at all. A zip-top bag with one corner snipped off works perfectly. You can also simply spoon the filling into the eggs and smooth the top with the back of a spoon. The filling won’t look as polished, but the taste is exactly the same. I’ve done both methods, and honestly, the spoon method is faster for large batches.
How do I get the “bloodshot” veins to look realistic?
Less is more. Dip a fine paintbrush in the diluted red coloring and paint very thin, slightly wavy lines starting from the olive and extending outward. Don’t make them all the same length — some longer, some shorter. Let a few lines branch off like real veins. Practice on a piece of paper first if you’re unsure. And remember, they don’t have to be perfect — creepy is the goal!
Conclusion
These spooky monster eyeball deviled eggs are the Halloween appetizer you didn’t know you needed. They’re fun to make, even more fun to serve, and absolutely delicious to eat. The creamy filling, the briny olive pupil, and those creepy bloodshot veins come together to create something that’s equal parts adorable and unsettling — which is exactly what Halloween food should be.
I hope you give this recipe a try, whether for a Halloween party, a spooky movie night, or just because you want to surprise your family with something different. Feel free to customize the flavors, swap the olives, or experiment with different colored veins. That’s the beauty of cooking — you can make it your own.
I’d love to hear how yours turn out! Drop a comment below and let me know if your guests screamed (in a good way) when they saw these eyeballs staring up from the platter. Share your photos, your variations, and your own kitchen tricks. After all, you never know — your nephew might teach you something new, too.
Pin This Recipe!

Best Spooky Monster Eyeball Deviled Eggs for Halloween
These spooky monster eyeball deviled eggs are the Halloween appetizer that gets people talking. Creamy filling, briny olive pupils, and creepy bloodshot veins come together for a fun, freaky, and delicious treat perfect for any spooky gathering.
- Prep Time: 15 minutes
- Cook Time: 12 minutes
- Total Time: 27 minutes
- Yield: 24 deviled egg halves (12 servings) 1x
- Category: Appetizer
- Cuisine: American
Ingredients
- 12 large eggs (room temperature)
- 1/3 cup mayonnaise (Hellmann’s or Duke’s recommended)
- 1 tablespoon yellow mustard (or Dijon for a sharper kick)
- 1 teaspoon white vinegar
- 1/2 teaspoon salt
- 1/4 teaspoon black pepper
- 1/2 teaspoon paprika (plus extra for garnish)
- 1 tablespoon pickle juice (optional but recommended)
- 1 can (6 oz) large black olives
- Red food coloring (gel works best)
- 1 small beet (optional natural alternative for red coloring)
Instructions
- Boil the eggs: Place eggs in a single layer in a pot. Cover with cold water by about an inch. Bring to a rolling boil over high heat. Once boiling, cover the pot, turn off the heat, and let sit for exactly 12 minutes. Prepare an ice bath in a large bowl.
- Cool the eggs: Transfer eggs to the ice bath using a slotted spoon. Let sit for at least 10 minutes to stop cooking and make peeling easier.
- Peel and prep: Gently tap each egg on the counter to crack the shell all over. Roll between palms to loosen, then peel under running cold water. Pat peeled eggs dry with a paper towel.
- Create the ‘pupil hole’: Take a clean plastic straw and press it gently into the wide end of each egg, pushing about 1/4 inch deep. Twist slightly and pull out to create a perfect circular indent.
- Cut the eggs: Using a sharp knife, slice each egg in half lengthwise. Gently pop out the yolks into a mixing bowl. Place egg white halves on serving tray, hole-side up.
- Make the filling: Mash yolks with a fork until finely crumbled. Add mayonnaise, mustard, vinegar, salt, pepper, and pickle juice. Mix until smooth and creamy. Taste and adjust seasoning.
- Fill the eggs: Spoon filling into a piping bag or zip-top bag. Snip off the corner and pipe filling into each egg white half, mounding slightly above the edge.
- Add the pupils: Drain black olives and pat dry. Cut each olive in half crosswise. Place one olive half, cut-side down, into the hole. Press gently to secure.
- Create the bloodshot veins: Mix a tiny drop of red gel food coloring with a drop of water. Using a clean paintbrush, paint thin lines radiating outward from the olive ‘pupil’ across the egg white.
- Garnish and serve: Sprinkle a tiny pinch of paprika over the filling (not the olive). Arrange on a platter and serve chilled.
Notes
For perfect hard-boiled eggs, use older eggs (not fresh) for easier peeling. Add a teaspoon of baking soda to the boiling water to help loosen shells. The ‘bloodshot’ veins may fade if made too far ahead, so decorate on the day of serving. For a natural red color, use beet juice instead of food coloring. The filling can be made ahead and stored separately.
Nutrition
- Serving Size: 2 deviled egg halves
- Calories: 130140
- Sugar: 12
- Sodium: 240300
- Fat: 810
- Saturated Fat: 23
- Carbohydrates: 24
- Fiber: 1
- Protein: 1012
Keywords: Halloween deviled eggs, monster eyeball deviled eggs, spooky appetizer, Halloween party food, deviled eggs recipe, eyeball deviled eggs, creepy deviled eggs


