There used to be a diner off Highway 61 in southern Minnesota called The Rusty Spoon that made a green bean casserole so good it ruined every other version for me. When they closed in 2017 — the owner retired, sold the building to a carwash — I honestly felt a little lost. That creamy, savory dish with the impossibly crispy onions on top was my go-to comfort food, especially around the holidays. After twelve tries — some burnt, some soupy, one where I accidentally used sweetened condensed milk (don’t ask) — I finally got it.
Let me tell you, the first time I pulled my version out of the oven, I stood there staring at it. The top was golden and bubbling at the edges, and the onions had that perfect crunch without being greasy. I almost cried. I mean, that sounds dramatic, but maybe you’ve been there — chasing a taste memory that feels just out of reach.
This Classic Make-Ahead Green Bean Casserole with Crispy Onions is the one. It’s got that same rich, creamy sauce, tender green beans, and that signature crunchy topping that makes everyone reach for seconds. The best part? You can make it ahead of time, which is a lifesaver when you’re juggling a holiday menu or just a busy weeknight. I’ve tweaked the original diner recipe to be more reliable at home, using a few simple tricks I picked up along the way. Honestly, this is the green bean casserole I keep coming back to, year after year. It just works.
Why You’ll Love This Recipe
I’ve tested this recipe more times than I care to count, and each batch taught me something new. What I love most is how forgiving it is — even if you overcook the beans a little or go heavy on the pepper, it still turns out fantastic. Here is why this version stands out from the crowd:
- Make-Ahead Friendly: Assemble it the day before, pop it in the fridge, and bake when you’re ready. No last-minute scrambling.
- Simple Ingredients: You probably have most of these in your pantry right now. No weird specialty items needed.
- Perfect for Holidays: Thanksgiving, Christmas, Easter — this dish fits right in. It’s the side that always disappears first.
- Crowd-Pleaser: I’ve served this to picky kids, foodie adults, and everyone in between. Empty dish every single time.
- Unbelievably Delicious: The creamy sauce coats every bean perfectly, and the crispy onions add that irresistible crunch. It’s comfort food at its finest.
What makes this recipe different is the technique. Instead of using canned soup straight from the can, I doctor it up with fresh mushrooms, a splash of soy sauce, and a pinch of nutmeg. It sounds weird, but trust me — that nutmeg brings out the earthiness of the mushrooms in a way that makes people ask, “What’s in this?” The make-ahead aspect isn’t just convenient; it actually helps the flavors meld together beautifully overnight.
This isn’t just another green bean casserole. It’s the kind that makes you close your eyes after the first bite. It’s comfort food reimagined — richer, creamier, and with the same soul-soothing satisfaction that makes you feel like everything is going to be okay.
What Ingredients You Will Need
This recipe uses simple, wholesome ingredients that come together to create something truly special. Most of these are pantry staples, which makes it easy to whip up on a whim or plan ahead for a big gathering.
For the Green Bean Casserole Base
- Fresh green beans, trimmed and halved — 2 pounds (about 900g). I prefer fresh over frozen for the best texture, but frozen works in a pinch. Look for bright green, firm beans without any brown spots.
- Unsalted butter — 4 tablespoons (56g). I use Land O’Lakes for its consistent quality. It adds richness to the sauce.
- Cremini mushrooms, sliced — 8 ounces (225g). These have more flavor than white button mushrooms. You can also use a mix of wild mushrooms for a fancier version.
- Yellow onion, finely diced — 1 medium (about 150g). A sweet onion like Vidalia works great too.
- Garlic cloves, minced — 3 cloves. Fresh garlic is non-negotiable here. The jarred stuff just doesn’t have the same punch.
- All-purpose flour — 3 tablespoons (24g). This helps thicken the sauce. For a gluten-free option, use a 1:1 gluten-free flour blend.
- Whole milk — 1 cup (240ml). Whole milk gives the creamiest result, but 2% works fine. Avoid skim milk — it makes the sauce watery.
- Heavy cream — 1/2 cup (120ml). This adds that luxurious texture. You can substitute with half-and-half, but the sauce won’t be as rich.
- Canned cream of mushroom soup — 1 can (10.5 ounces or 298g). I know, I know — using canned soup feels like cheating. But it’s the secret to that classic diner flavor. I recommend Campbell’s for consistency.
- Soy sauce — 1 tablespoon (15ml). This adds umami depth without making it taste like soy. Trust me on this one.
- Freshly ground black pepper — 1/2 teaspoon. Plus more for finishing.
- Pinch of nutmeg — Just a tiny pinch, about 1/8 teaspoon. It’s the secret ingredient that makes people wonder what’s different.
For the Crispy Onion Topping
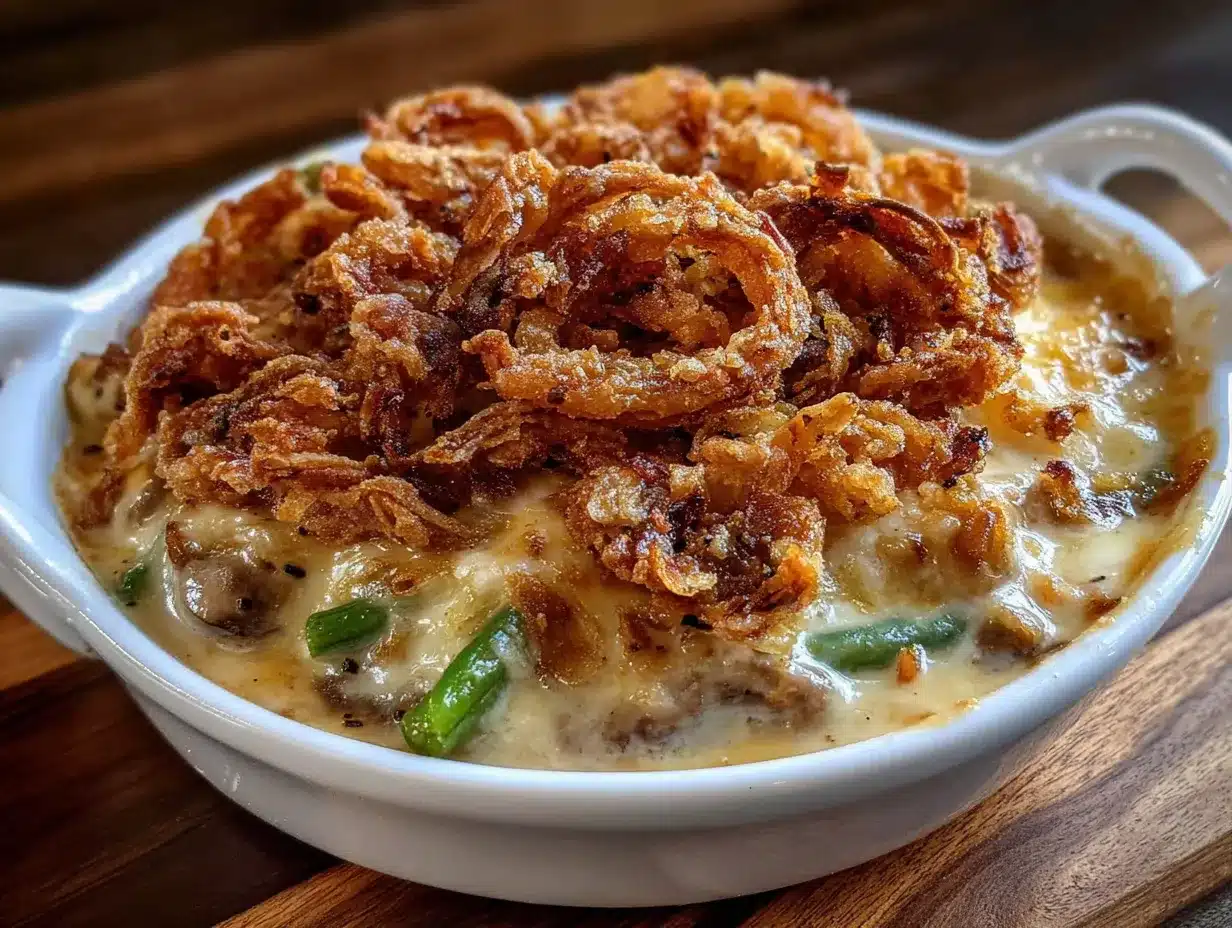
- Store-bought crispy fried onions — 1 1/2 cups (about 85g). French’s is the classic choice, and it’s what I use. They hold up well during baking.
- Panko breadcrumbs — 1/4 cup (15g). This extra layer adds even more crunch. You can skip it if you want, but why would you?
- Melted butter — 1 tablespoon (14g). For brushing the top before baking.
I always recommend using fresh green beans for this recipe. They hold their texture better than frozen or canned, especially when you’re making it ahead. If you’re in a rush, frozen green beans work — just thaw them first and pat them dry so they don’t water down the sauce. For the mushrooms, I’ve tried using just white buttons, but the creminis really do make a difference in flavor depth.
Equipment Needed
You don’t need a fancy kitchen to pull this off. Here is what you’ll need:
- Large pot — For blanching the green beans. A 6-quart pot works well.
- Large skillet or sauté pan — For cooking the mushrooms and making the sauce. A 12-inch skillet is ideal.
- 9×13-inch baking dish — This is the standard size for a family-sized casserole. A 3-quart dish works too.
- Mixing bowls — One large bowl for combining everything, plus a small one for the topping.
- Sharp knife and cutting board — For trimming the beans and slicing mushrooms.
- Wooden spoon or silicone spatula — For stirring the sauce without scratching your pan.
- Measuring cups and spoons — Accuracy matters, especially with the flour and liquid.
- Colander — For draining the blanched beans.
- Aluminum foil — For covering the casserole if it browns too quickly.
If you don’t have a 9×13 dish, you can use a 10-inch cast iron skillet for a rustic look. I’ve done that before, and it works beautifully — just reduce the baking time by about 5 minutes since the skillet holds heat differently. For the panko topping, I’ve also used crushed potato chips in a pinch. It sounds crazy, but it adds a salty crunch that’s pretty amazing.
Preparation Method
Let’s get cooking! This recipe comes together in about 45 minutes of active time, plus a quick bake. If you’re making it ahead, just stop after step 8 and refrigerate.
- Preheat your oven to 375°F (190°C). If you’re making this ahead, you can skip this step until you’re ready to bake.
- Blanch the green beans. Bring a large pot of salted water to a boil. Add the trimmed and halved green beans and cook for exactly 3 minutes. You want them bright green and tender-crisp. Drain immediately and transfer to a bowl of ice water to stop the cooking. Let them sit for 2 minutes, then drain well and pat dry with a clean kitchen towel. This step is crucial — it sets the color and texture so your beans don’t turn mushy later.
- Cook the mushrooms. In a large skillet, melt 2 tablespoons of butter over medium-high heat. Add the sliced cremini mushrooms and cook, stirring occasionally, until they release their liquid and start to brown — about 6 to 7 minutes. Don’t crowd the pan; if your skillet is small, do this in batches. You want them golden, not steamed.
- Sauté the aromatics. Add the remaining 2 tablespoons of butter to the skillet with the mushrooms. Once melted, add the diced onion and cook until softened, about 4 minutes. Add the minced garlic and cook for 30 seconds until fragrant. Your kitchen should smell amazing right about now.
- Make the roux. Sprinkle the flour over the mushroom-onion mixture and stir constantly for 1 minute. This cooks out the raw flour taste. The mixture will look thick and pasty — that’s exactly what you want.
- Add the liquids. Slowly pour in the milk and heavy cream, whisking continuously to prevent lumps. Bring to a gentle simmer, then reduce heat to low. Stir in the can of cream of mushroom soup, soy sauce, black pepper, and that pinch of nutmeg. Cook for 2 to 3 minutes, stirring often, until the sauce is smooth and slightly thickened. Taste it — you might want a little more pepper.
- Combine everything. Remove the skillet from heat. Add the blanched green beans and stir until they’re fully coated in that luscious sauce. Make sure every bean gets some love.
- Transfer to the baking dish. Pour the mixture into your greased 9×13-inch baking dish and spread it into an even layer. At this point, you can cover and refrigerate for up to 24 hours if you’re making it ahead.
- Prepare the topping. In a small bowl, combine the crispy fried onions and panko breadcrumbs. Drizzle with the melted butter and toss to coat evenly. Set aside.
- Bake and top. If baking immediately, place the casserole in the preheated oven and bake for 20 minutes. Remove from the oven, sprinkle the onion-panko mixture evenly over the top, and return to the oven for another 10 to 12 minutes, until the topping is golden brown and the casserole is bubbly around the edges. If you’re baking from cold, add 10 minutes to the first bake time before adding the topping.
- Rest and serve. Let the casserole rest for 5 minutes before serving. This lets the sauce set up a bit so it’s not soupy. Serve hot and watch it disappear.
A quick note: if your topping starts browning too fast, loosely tent the dish with aluminum foil for the last 5 minutes. I learned this the hard way after burning my first batch of onions to a crisp. Also, don’t skip the rest time — it makes a real difference in the final texture.
Cooking Tips & Techniques
Over the years, I’ve made every mistake you can imagine with this dish. Here are the lessons I learned so you don’t have to repeat them:
Don’t overcook the beans. Three minutes in boiling water is plenty. If you’re using frozen beans, thaw them completely and skip the blanching — just add them directly to the sauce. Canned beans? Drain them well and add them at the end. They’re already cooked, so you just need to heat them through.
Toast your panko. For extra crunch, toast the panko breadcrumbs in a dry skillet over medium heat for 2 minutes before mixing them with the onions. It takes almost no effort and makes a huge difference in texture. I started doing this after a particularly soggy batch, and I’ve never gone back.
Season as you go. Don’t wait until the end to add salt and pepper. Season the mushrooms while they cook, season the sauce before adding the beans, and taste everything. The soy sauce adds saltiness, so go easy on additional salt until you’ve tasted the final sauce.
Make extra topping. I always make about 25% more topping than I think I need. It sinks into the sauce a little during baking, and having that extra crunch on top makes everyone happy. Plus, you can snack on the leftovers while you’re waiting for the casserole to bake.
Use room temperature dairy. Cold milk and cream can seize up your sauce and make it lumpy. Let them sit on the counter for 15 minutes before you start cooking. If you forget, microwave the milk for 20 seconds — just don’t let it boil.
Multitask like a pro. While the green beans are blanching, you can start cooking the mushrooms. While the sauce is simmering, you can prep the topping. This recipe flows really well if you stay organized. I usually set out all my ingredients before I start, which saves me from frantically searching for the soy sauce while something burns.
Variations & Adaptations
This recipe is wonderfully flexible. Here are some ways to make it your own:
Vegetarian Version: This recipe is already vegetarian if you use a vegetarian cream of mushroom soup. Some brands use beef broth, so check the label. You can also add extra mushrooms for more umami — try shiitake or oyster mushrooms for a gourmet twist.
Gluten-Free Adaptation: Use gluten-free all-purpose flour for the roux and gluten-free panko breadcrumbs for the topping. Most crispy fried onions are gluten-free, but double-check the label. I’ve made this for gluten-free friends, and they couldn’t tell the difference.
Dairy-Free Option: Substitute the butter with vegan butter or olive oil, use unsweetened oat milk or almond milk for the milk, and replace the heavy cream with full-fat coconut cream. The flavor changes slightly, but it’s still delicious. I tried this version when my sister was dairy-free, and it was a hit.
Protein-Packed Variation: Add 1 cup of cooked, crumbled bacon or diced ham to the casserole before baking. It adds a smoky depth that’s incredible. I once made this with leftover holiday ham, and it became a new family favorite.
Spicy Kick: Add 1/2 teaspoon of red pepper flakes or a diced jalapeño to the mushroom mixture. The heat balances beautifully with the creamy sauce. My husband loves this version, though I stick with the original.
Fresh Herb Finish: Stir in 2 tablespoons of fresh thyme or rosemary leaves just before baking. It brightens up the whole dish and makes it feel a little fancier. I do this when I’m serving it for company.
Serving & Storage Suggestions
This casserole is best served hot, straight from the oven. The contrast between the creamy sauce and the crunchy topping is at its peak within the first 15 minutes. Let it rest for 5 minutes after baking so the sauce sets, then scoop it onto plates or serve family-style from the dish.
What to serve with it: This is the ultimate holiday side, so it pairs beautifully with roasted turkey, mashed potatoes, and cranberry sauce. For a weeknight meal, I serve it alongside roasted chicken or pork chops. A simple green salad with vinaigrette cuts through the richness nicely.
Storage: Leftovers keep well in an airtight container in the refrigerator for up to 4 days. The topping will lose some of its crunch, but the flavor only gets better. To reheat, place individual portions in the microwave for 1 to 2 minutes, or reheat the whole casserole in a 350°F oven for 15 to 20 minutes, covered with foil to prevent the topping from burning.
Freezing: You can freeze the unbaked casserole for up to 3 months. Assemble it in the baking dish, cover tightly with plastic wrap and foil, and freeze. To bake, thaw overnight in the refrigerator, then bake as directed, adding 10 to 15 minutes to the cooking time. I’ve done this for Thanksgiving prep, and it’s a lifesaver.
Flavor development: Honestly, this casserole tastes even better the next day. The flavors meld together overnight, creating a deeper, more cohesive dish. If you can resist eating it all on day one, you’re in for a treat on day two.
Nutritional Information & Benefits
Here is the approximate nutritional breakdown for one serving (about 1 cup, based on 8 servings):
| Nutrient | Amount |
|---|---|
| Calories | 285 |
| Total Fat | 18g |
| Saturated Fat | 10g |
| Cholesterol | 45mg |
| Sodium | 620mg |
| Total Carbohydrates | 24g |
| Dietary Fiber | 4g |
| Sugars | 6g |
| Protein | 6g |
Green beans are a good source of vitamins A, C, and K, as well as fiber and folate. The mushrooms provide B vitamins and selenium, which supports immune function. While this isn’t a low-calorie dish, it’s a satisfying side that can be part of a balanced meal. I like to serve it with lean protein and a fresh salad to round things out.
For those watching their sodium, you can use low-sodium cream of mushroom soup and reduce the added salt. The soy sauce adds a fair amount of sodium, so consider using a low-sodium version if that’s a concern. This recipe is not suitable for those with dairy or gluten sensitivities unless you use the substitutions mentioned above.
Conclusion
This Classic Make-Ahead Green Bean Casserole with Crispy Onions is the recipe I reach for every single holiday season — and plenty of regular Tuesdays too. It’s got that nostalgic diner flavor I fell in love with at The Rusty Spoon, but it’s even better because I can make it ahead and actually enjoy my time with family instead of stressing in the kitchen.
I hope you give this recipe a try and make it your own. Maybe you’ll add bacon, or extra garlic, or a sprinkle of fresh herbs. That’s the beauty of cooking — you take something familiar and twist it until it feels like yours. I’d love to hear how it turns out for you. Did you try a variation? Did your family fight over the last scoop? Drop a comment below and let me know. And if you loved it, share it with a friend who needs a little comfort food in their life.
Happy cooking, friend. You’ve got this.
Frequently Asked Questions
Can I use frozen green beans instead of fresh?
Yes, you absolutely can. Thaw them completely and pat them dry with a paper towel before adding them to the sauce. Skip the blanching step since frozen beans are already blanched. Just stir them into the sauce and proceed with the recipe.
How far ahead can I make this casserole?
You can assemble the casserole (without the topping) up to 24 hours in advance. Keep it covered in the refrigerator. When you’re ready to bake, add about 10 extra minutes to the first bake time before adding the topping. The flavors actually improve overnight!
Why is my casserole watery?
This usually happens for one of three reasons: you didn’t drain the blanched beans well enough, you used frozen beans without thawing and drying them, or you didn’t cook the sauce long enough to thicken. Make sure to pat everything dry, and let the sauce simmer for a full 3 minutes before adding the beans.
Can I make this without cream of mushroom soup?
Sure, but it won’t taste quite the same. If you want to skip the canned soup, increase the milk to 1 1/2 cups and the heavy cream to 3/4 cup, and add an extra 2 tablespoons of flour to the roux. You’ll also need to add more salt and a bit of onion powder to compensate for the seasoning in the soup.
How do I keep the topping crispy?
The best trick is to add the topping halfway through baking, not at the beginning. Bake the casserole for 20 minutes first, then add the topping and bake for another 10 to 12 minutes. If you’re reheating leftovers, use the oven instead of the microwave — the microwave will make the topping soggy every time.
Pin This Recipe!

Classic Make-Ahead Green Bean Casserole

This creamy, savory green bean casserole with crispy onions is a nostalgic diner-inspired dish that can be made ahead of time. Perfect for holidays or busy weeknights, it features a rich sauce with fresh mushrooms, a touch of soy sauce, and a secret pinch of nutmeg.
- Prep Time: 15 minutes
- Cook Time: 45 minutes
- Total Time: 1 hour
- Yield: 8 servings 1x
- Category: Side Dish
- Cuisine: American
Ingredients
- 2 pounds fresh green beans, trimmed and halved
- 4 tablespoons unsalted butter
- 8 ounces cremini mushrooms, sliced
- 1 medium yellow onion, finely diced
- 3 cloves garlic, minced
- 3 tablespoons all-purpose flour
- 1 cup whole milk
- 1/2 cup heavy cream
- 1 can (10.5 ounces) cream of mushroom soup
- 1 tablespoon soy sauce
- 1/2 teaspoon freshly ground black pepper
- 1/8 teaspoon nutmeg
- 1 1/2 cups store-bought crispy fried onions
- 1/4 cup panko breadcrumbs
- 1 tablespoon melted butter
Instructions
- Preheat oven to 375°F (190°C).
- Blanch the green beans: Bring a large pot of salted water to a boil. Add green beans and cook for exactly 3 minutes. Drain and transfer to a bowl of ice water for 2 minutes. Drain well and pat dry.
- Cook the mushrooms: In a large skillet, melt 2 tablespoons butter over medium-high heat. Add sliced mushrooms and cook until browned, about 6-7 minutes.
- Sauté aromatics: Add remaining 2 tablespoons butter to the skillet. Add diced onion and cook until softened, about 4 minutes. Add minced garlic and cook for 30 seconds.
- Make the roux: Sprinkle flour over the mushroom-onion mixture and stir constantly for 1 minute.
- Add liquids: Slowly pour in milk and heavy cream, whisking continuously. Bring to a gentle simmer, then reduce heat to low. Stir in cream of mushroom soup, soy sauce, black pepper, and nutmeg. Cook for 2-3 minutes until smooth and slightly thickened.
- Combine: Remove skillet from heat. Add blanched green beans and stir until fully coated.
- Transfer to baking dish: Pour mixture into a greased 9×13-inch baking dish and spread evenly. (At this point, cover and refrigerate for up to 24 hours if making ahead.)
- Prepare topping: In a small bowl, combine crispy fried onions and panko breadcrumbs. Drizzle with melted butter and toss to coat.
- Bake: If baking immediately, place casserole in oven and bake for 20 minutes. Remove, sprinkle topping evenly, and bake for another 10-12 minutes until golden and bubbly. If baking from cold, add 10 minutes to the first bake time.
- Rest and serve: Let casserole rest for 5 minutes before serving.
Notes
For extra crunch, toast panko breadcrumbs in a dry skillet for 2 minutes before mixing with onions. Use room temperature dairy to prevent lumpy sauce. If topping browns too fast, tent with foil for the last 5 minutes.
Nutrition
- Serving Size: 1 cup
- Calories: 285
- Sugar: 6
- Sodium: 620
- Fat: 18
- Saturated Fat: 10
- Carbohydrates: 24
- Fiber: 4
- Protein: 6
Keywords: green bean casserole, make-ahead, holiday side dish, crispy onions, Thanksgiving, comfort food


