The sourdough starter deadline was in three days and I had somehow convinced myself I could make it from scratch. My neighbor Karen had casually mentioned her “thirty-year-old mother starter” at the block party, and suddenly everyone was trading sourdough promises like baseball cards. I nodded along, pretending I had one too. The truth? I had a bag of whole wheat flour, a mason jar, and absolutely no idea what I was doing.
The next morning I stood in my kitchen at 6 AM, staring at a sticky paste that looked more like wallpaper glue than something that could become bread. I almost gave up right there. But here’s the thing about this easy beginner’s sourdough starter from scratch — it doesn’t care if you’re impatient, if you forget to feed it on time, or if you accidentally use tap water instead of filtered. It just works. Maybe you’ve been there, staring at a cloudy jar wondering if you’d made a terrible mistake.
By day three, something magical happened. Tiny bubbles appeared, like someone had dropped a handful of pearls into the mix. The smell shifted from funky to fruity, and I found myself checking on it every few hours like a new pet. Honestly, I didn’t expect to get attached. But when Karen tasted the bread I made from my own starter — my cheap, scrappy, no-special-equipment starter — she asked for the recipe. That moment stuck with me. This recipe stays because it proves you don’t need a fancy heirloom starter or years of experience. You just need a little patience and this exact method.
Why You’ll Love This Recipe
Let me tell you why this easy beginner’s sourdough starter from scratch is different from every other tutorial you’ve seen. I tested this method four times before I got it right, tweaking the ratios and timing until it worked consistently. This isn’t some theoretical recipe — it’s the one I use every week, and it has never failed me.
- Foolproof 5-Day Timeline: Most recipes take 7-14 days, but this one gets you a bubbly, active starter ready for baking in just five days. Perfect for impatient people like me.
- Simple Ingredients: You need exactly two things — flour and water. No special organic flour, no pineapple juice, no fancy equipment. Your pantry already has everything.
- Budget-Friendly: A bag of all-purpose flour costs about two dollars. Compare that to buying a dehydrated starter online for fifteen bucks plus shipping.
- No Special Equipment: A glass jar, a kitchen scale, and a rubber band are all you need. I used a pickle jar for my first starter, and it worked great.
- Unbelievably Reliable: This method produces a starter that doubles in size predictably, has a pleasant tangy aroma, and bakes beautifully on day five. I’ve taught three friends using this exact recipe, and all of them had success.
What makes this recipe different is the feeding schedule. Instead of complicated ratios and multiple feedings per day, this uses a simple 1:1:1 ratio that’s easy to remember. One part starter, one part flour, one part water. That’s it. The timing is designed around a normal person’s schedule — feed it in the morning and evening, no middle-of-the-night alarms required.
This isn’t just a starter — it’s the beginning of something you’ll feel genuinely proud of. There’s something special about pulling a loaf of bread out of the oven that started as flour and water in a jar. It makes you feel like you’ve unlocked a secret level of cooking. Perfect for beginners who want real results without the stress.
What Ingredients You Will Need
This easy beginner’s sourdough starter from scratch uses the simplest ingredients possible. The key is understanding what each ingredient does and how to choose the right ones for success.
- All-purpose flour: This is your workhorse ingredient. I recommend Gold Medal or King Arthur for consistent results. All-purpose flour has the right balance of protein for a healthy starter without being too heavy. Store brand works fine too — I’ve tested it. (Avoid bleached flour if possible; unbleached gives better fermentation.)
- Whole wheat flour (optional but recommended): Adding whole wheat flour for the first feeding gives your starter a boost of natural yeast and bacteria. Whole wheat has more nutrients for the microorganisms to eat, which means faster fermentation. I use Bob’s Red Mill whole wheat flour, but any brand works. (Substitute: rye flour works even better if you have it.)
- Filtered water: Tap water can contain chlorine that kills the natural yeast you’re trying to cultivate. Filtered water is ideal, but if you don’t have a filter, let tap water sit out overnight to let the chlorine evaporate. Bottled spring water works perfectly too. The water should be lukewarm — about 75-80°F — not hot, not cold.
For the 5-Day Schedule, you’ll need approximately:
- Day 1: 1/2 cup (60g) whole wheat flour + 1/2 cup (120ml) water
- Days 2-5: About 1 cup (120g) all-purpose flour + 1/2 cup (120ml) water per feeding (you’ll discard some starter each time)
- Total flour needed: roughly 3-4 cups over 5 days
Ingredient selection tips: Look for flour that feels fresh — check the expiration date on the bag. Old flour has less microbial activity and can slow down your starter development. If you live in a humid climate, you might need slightly less water. If you’re in a dry climate, you might need a touch more. The consistency you’re aiming for is thick pancake batter.
Substitution guidance: For gluten-free starter, use brown rice flour or sorghum flour — the process is the same but may take a few extra days. For whole grain enthusiasts, spelt or einkorn flour creates a wonderfully complex flavor profile. Just know that different flours ferment at different rates, so adjust your expectations accordingly.
Equipment Needed
You don’t need much for this easy beginner’s sourdough starter from scratch. Here’s what I use and what you can substitute if you’re improvising.
- Glass jar (1-quart or larger): A wide-mouth mason jar is perfect. I use a 32-ounce Ball jar. The wide mouth makes it easy to stir and scrape down the sides. (Alternative: any glass container works — a pickle jar, a pasta sauce jar, even a large drinking glass. Just make sure it’s clean and has room for the starter to double in size.)
- Kitchen scale: This is the one piece of equipment I strongly recommend buying. Measuring by weight is far more accurate than volume, especially for sourdough. A basic digital scale costs about $15 on Amazon. (Alternative: measuring cups work, but your results will be less consistent. I used measuring cups my first time and it still worked — just took an extra day.)
- Rubber band or marker: You’ll use this to mark the starting height of your starter so you can see how much it rises. A simple rubber band around the jar works perfectly. (Alternative: a piece of tape or a dry-erase marker directly on the glass.)
- Wooden or silicone spoon: Metal can react with the developing acids in your starter, so stick with wood or silicone. I use a wooden chopstick for stirring — it reaches the bottom of the jar easily. (Alternative: a plastic spoon works fine too.)
- Clean kitchen towel or coffee filter: You need to cover your jar loosely to keep out dust and bugs while allowing air circulation. A coffee filter secured with a rubber band is my favorite method. (Alternative: paper towel or cheesecloth.)
Budget-friendly tip: Don’t rush out to buy special sourdough starter jars or kits. I started with a repurposed salsa jar and a chopstick. The starter doesn’t care about fancy equipment — it just needs consistent care.
Preparation Method
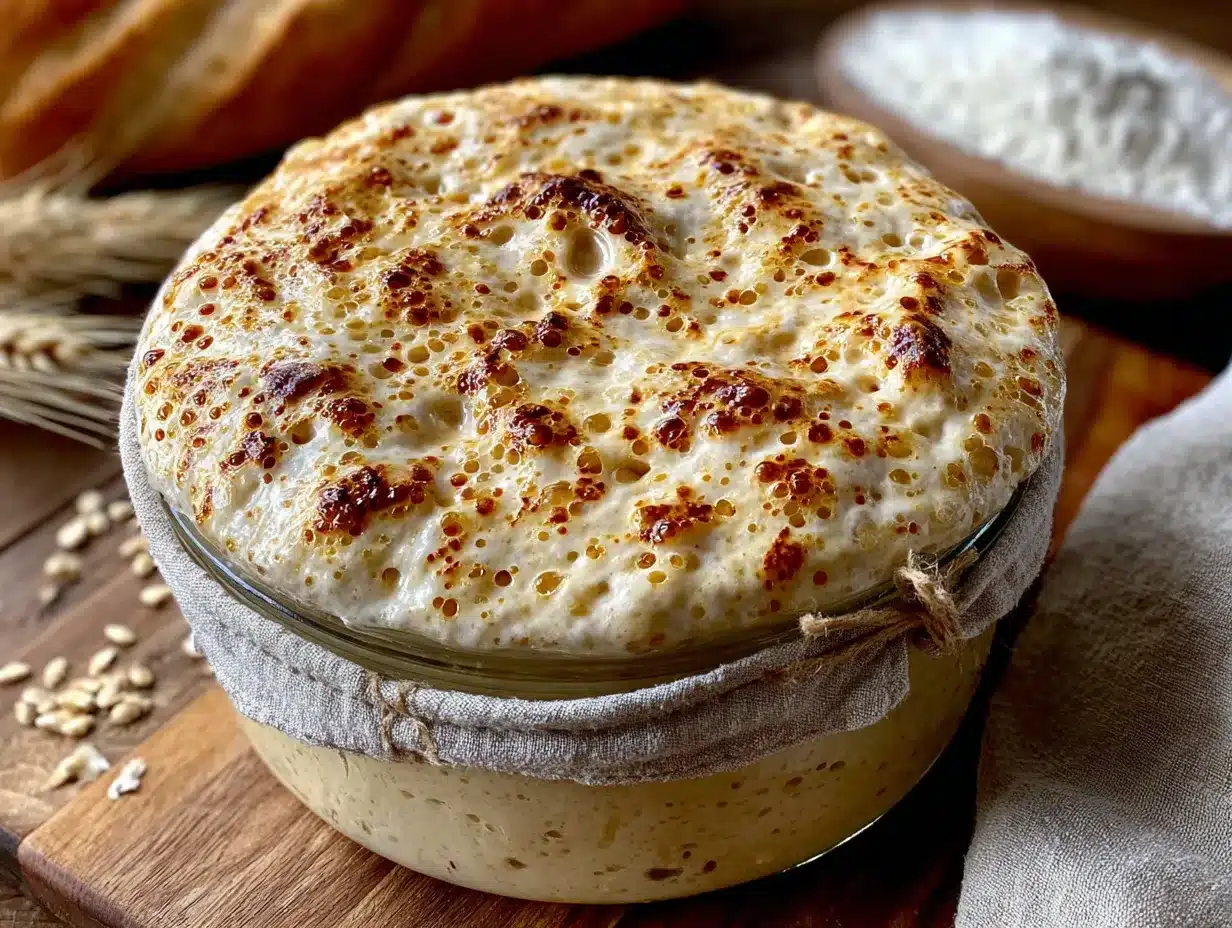
Follow these steps exactly, and you’ll have a bubbling, active easy beginner’s sourdough starter from scratch in five days. I’ve broken it down by day so you know exactly what to expect.
Day 1: The Beginning
Time needed: 5 minutes
- Combine 1/2 cup (60g) whole wheat flour and 1/2 cup (120ml) lukewarm filtered water in your clean glass jar. If you don’t have whole wheat, use all-purpose flour instead — whole wheat just gives a faster start.
- Stir vigorously until no dry flour remains. The mixture should look like thick pancake batter. If it seems too thick, add a tablespoon of water. Too thin, add a tablespoon of flour.
- Scrape down the sides of the jar with your spoon so you can see the actual volume of the mixture.
- Mark the height of the mixture with your rubber band or marker.
- Cover loosely with your towel or coffee filter and secure with a rubber band.
- Place the jar in a warm spot in your kitchen — around 70-75°F is ideal. The top of the refrigerator works great, or a corner of your counter away from drafts.
- Let it sit undisturbed for 24 hours.
What to expect: Nothing much will happen on day one. You might see a few tiny bubbles, or nothing at all. The mixture might develop a slightly sour or funky smell — that’s normal. Don’t worry if it looks the same as when you started.
Day 2: First Feeding
Time needed: 10 minutes
- Check your starter. You’ll probably see some liquid on top (called “hooch”) and maybe a few bubbles. The smell might be stronger — like overripe fruit or even a little cheesy. All of this is normal.
- Discard about half of the starter. Don’t skip this step! Discarding keeps the yeast-to-food ratio balanced. I discard into the trash, not the sink (it can clog pipes).
- Add 1/2 cup (60g) all-purpose flour and 1/2 cup (120ml) lukewarm filtered water to the remaining starter.
- Stir well until combined. Scrape down the sides. Mark the new height with your rubber band.
- Cover and return to its warm spot.
- Repeat this feeding every 24 hours for the next three days.
Pro tip: I set a daily alarm on my phone for the same time each morning. Consistency matters more than the exact time — feeding at 8 AM every day works better than feeding at 8 AM one day and 8 PM the next.
Day 3: The Awakening
Time needed: 10 minutes
- By day three, you should see noticeable changes. The starter should have bubbles throughout, and it might have doubled in size since feeding. The smell should be more pleasant — like yogurt or sourdough bread.
- If you see a layer of liquid on top (hooch), that’s a sign your starter is hungry. Don’t worry — just proceed with the feeding.
- Discard half the starter again. Add 1/2 cup (60g) all-purpose flour and 1/2 cup (120ml) lukewarm water.
- Stir, scrape, mark, cover, and return to its spot.
- Check on it 6-8 hours after feeding. If it’s bubbly and rising, you’re on track. If not, just keep going — some starters take longer.
Troubleshooting: If your starter smells like nail polish remover or acetone, it’s too hungry. Feed it more frequently — every 12 hours instead of 24. If it smells like rotten eggs, it might need warmer temperatures. Move it to a slightly warmer spot.
Day 4: Building Strength
Time needed: 10 minutes
- Your starter should be noticeably more active now. It might double in size within 6-8 hours of feeding. The surface should be covered in bubbles, and the texture should look like a sponge.
- Discard half, then feed with 1/2 cup (60g) all-purpose flour and 1/2 cup (120ml) lukewarm water.
- This time, pay attention to how quickly it rises. If it doubles within 6 hours, your starter is getting strong. If it takes longer, that’s okay — it just needs another day or two.
- Continue with the same 24-hour feeding schedule.
Sensory cue: A healthy starter at this stage should have a pleasant, slightly tangy smell — like fresh bread dough with a hint of apple cider vinegar. The texture should be airy and bubbly, almost like foam.
Day 5: Ready to Bake
Time needed: 10 minutes
- By day five, your starter should reliably double in size within 4-6 hours of feeding. It should have a domed top, lots of bubbles, and a pleasant sour aroma.
- Do one final feeding: discard half, add 1/2 cup (60g) all-purpose flour and 1/2 cup (120ml) lukewarm water.
- Wait 4-6 hours after feeding. Your starter should be at its peak — bubbly, doubled, and ready to use.
- To test if it’s ready: drop a small spoonful of starter into a glass of water. If it floats, it’s active enough to bake with. If it sinks, give it one more day.
- Your starter is now ready to use in any sourdough recipe! Congratulations — you did it.
Important note: If your starter isn’t doubling reliably by day five, don’t panic. Some starters take 7-10 days, especially in cooler kitchens. Just keep feeding once a day and be patient. My first starter took eight days, and it makes fantastic bread now.
Cooking Tips & Techniques
After making this easy beginner’s sourdough starter from scratch more times than I can count, here are the tips I wish someone had told me on day one.
Temperature is everything. Your starter is alive, and like all living things, it has a comfort zone. The ideal temperature range is 70-78°F. If your kitchen is cooler (60-65°F), fermentation will slow down significantly. I learned this the hard way when my winter starter took two weeks to mature. Solution: place your jar on top of the refrigerator, near the water heater, or inside a turned-off oven with the light on. Just don’t put it somewhere too warm — above 85°F can kill the yeast.
Don’t skip the discard. I know it feels wasteful to throw away half your starter every day. I felt the same way. But here’s the thing — if you don’t discard, you’ll end up with a massive amount of starter that needs huge amounts of flour to feed. Plus, the ratio of old starter to fresh food gets thrown off, and your starter won’t ferment properly. Save your discard in a separate jar in the fridge — you can use it to make sourdough pancakes, crackers, or even pizza dough.
Watch for the false rise. Around day 2 or 3, many beginners see a big burst of activity and think their starter is ready. This is called the “false rise” — it’s caused by bacteria that are active before the yeast population has grown enough. Your starter will get very bubbly and rise dramatically, then fall flat. Don’t be discouraged. This is normal. Keep feeding, and the real yeast will take over in a few days.
Consistency matters more than perfection. I used to obsess over getting the exact right texture, measuring flour and water to the gram. While precision helps, I’ve made perfectly good starter using measuring cups and eyeballing the consistency. The goal is a thick batter that holds its shape briefly when you stir it. If it’s too runny, add a little more flour. Too stiff, add a splash of water. You’ll develop a feel for it.
My biggest failure: I once forgot to feed my starter for three days. It developed a thick layer of dark hooch on top and smelled like a brewery. I almost threw it away. Instead, I poured off the hooch, fed it twice (12 hours apart), and within two days it was back to normal. Sourdough starter is surprisingly resilient — don’t give up on it too quickly.
Variations & Adaptations
Once you’ve mastered this easy beginner’s sourdough starter from scratch, you can experiment with different approaches. Here are variations I’ve tried and loved.
Whole Grain Starter: Instead of switching to all-purpose flour after day one, keep using whole wheat or rye flour for the entire process. Rye flour, in particular, ferments quickly and creates a very robust starter with a deeper, earthier flavor. The feeding schedule stays the same, but you might find your starter is ready a day earlier. I keep a rye starter going alongside my all-purpose one for when I want a heartier bread.
Gluten-Free Starter: Use brown rice flour or sorghum flour instead of wheat flour. The process is identical, but gluten-free starters tend to be more liquid and may take 7-10 days to become active. They also need to be fed more frequently — every 12 hours once they get going. I developed this version for a friend with celiac disease, and while it’s a bit more work, the results are worth it for gluten-free sourdough.
Cold Fermentation Method: If you want a more sour flavor, after day 5, start feeding your starter and then immediately placing it in the refrigerator for 12-24 hours between feedings. The cold temperature encourages the production of acetic acid, which gives sourdough its tangy flavor. This method works well if you only bake on weekends — just feed it, refrigerate, and feed again before using.
Flavor Experimentation: Add a tablespoon of unfiltered apple cider vinegar or a teaspoon of honey to your first feeding. The vinegar provides an acidic environment that discourages unwanted bacteria, while the honey gives the yeast an extra energy source. I tried the honey method once and noticed my starter was ready a full day earlier. Just be aware that honey can change the flavor profile slightly.
Serving & Storage Suggestions
Now that you have a thriving easy beginner’s sourdough starter from scratch, here’s how to keep it alive and use it properly.
Storage: Once your starter is active and reliable, you can store it in the refrigerator to slow down fermentation. Feed it, let it sit at room temperature for 1-2 hours, then cover and refrigerate. In the fridge, you only need to feed it once a week. I feed mine every Sunday morning — it’s become part of my weekend routine. If you’re not baking frequently, this is the way to go.
Before baking: Take your starter out of the fridge 12-24 hours before you plan to bake. Feed it and let it sit at room temperature until it’s bubbly and doubled. This “waking up” process ensures your starter is active enough to leaven bread properly. I usually take mine out the evening before baking day.
Flavor development: The flavor of your starter will continue to develop over time. A starter that’s been alive for a month will have a more complex, tangy flavor than a week-old starter. Some bakers claim their starters improve for years. I’ve noticed my six-month-old starter produces noticeably better bread than it did in the beginning — the flavor is deeper and more rounded.
Reheating and using: Always bring refrigerated starter to room temperature before using in recipes. Use the amount called for in your recipe, then feed the remaining starter. If a recipe calls for “fed starter,” make sure you’ve fed it within the last 4-8 hours and it’s at its peak activity. If it calls for “unfed starter” or “discard,” you can use it straight from the fridge.
Long-term storage: If you need to take a break from baking, you can dehydrate your starter. Spread it thinly on parchment paper, let it dry completely (2-3 days), then break it into flakes and store in an airtight container. To revive it, mix the flakes with warm water and flour and feed as usual. I’ve revived starter that was dehydrated for over a year — it took about a week to become fully active again.
Nutritional Information & Benefits
While your easy beginner’s sourdough starter from scratch isn’t something you eat directly, it transforms the nutritional profile of the bread you make with it. Here’s what you should know.
Estimated nutritional values for the starter itself: The starter is mostly flour and water, so its nutritional content is minimal in the small amounts used in baking. The fermentation process, however, makes nutrients more bioavailable. Sourdough fermentation breaks down phytic acid, which can block mineral absorption, making the iron, zinc, and magnesium in your bread easier for your body to use.
Health benefits: Sourdough bread made with a natural starter has a lower glycemic index than bread made with commercial yeast. This means it causes a slower, more gradual rise in blood sugar. The fermentation process also creates beneficial bacteria that act as probiotics, supporting gut health. Some people who have trouble digesting wheat find they can tolerate sourdough better because the fermentation partially breaks down gluten proteins.
Dietary considerations: This starter is naturally vegan and contains no added sugars, fats, or preservatives. For gluten-free versions, use brown rice or sorghum flour as mentioned in the variations section. The starter itself is low in calories — the small amount used in baking contributes minimal calories to the final product.
Potential allergens: Traditional sourdough starter contains wheat gluten. If you’re baking for someone with celiac disease, maintain a completely separate gluten-free starter and use dedicated equipment to avoid cross-contamination.
My personal take: I started making sourdough because I wanted to eat bread that felt more wholesome. Knowing exactly what goes into my starter — just flour, water, and time — gives me peace of mind. Plus, the slower fermentation means I can enjoy bread without the bloated feeling I sometimes get from commercial bread. It’s not a health cure-all, but it’s a meaningful step toward eating more intentionally.
Conclusion
Making your own easy beginner’s sourdough starter from scratch is one of those kitchen projects that feels intimidating until you actually do it. Then you wonder why you waited so long. It’s just flour and water, after all — two ingredients you probably already have in your kitchen. The magic happens when you give them time and a little attention.
I still remember the pride I felt pulling my first loaf of sourdough out of the oven, knowing it started with that bubbly jar on my counter. That feeling never gets old. Every time I feed my starter, I’m reminded that good things take a little patience — and that’s a lesson that extends far beyond the kitchen.
I’d love to hear how your starter journey goes. Did it take the full five days? Did you have any surprises along the way? Drop a comment below and let me know. And if you end up making your first loaf of sourdough bread with your new starter, come back and tell me about it. That’s my favorite part of this whole process — watching other people discover the joy of baking with something they created themselves.
Now go check on your jar. It’s probably hungry.
Frequently Asked Questions
Why does my sourdough starter smell like nail polish remover?
This is completely normal and happens when your starter is hungry. The acetone-like smell means the yeast has consumed most of the available food and is producing byproducts. Simply feed your starter more frequently — every 12 hours instead of 24 — and the smell should mellow out within a day or two.
Can I use my sourdough starter straight from the refrigerator?
You can, but it won’t be at peak activity. For best results in baking, take your starter out of the fridge 12-24 hours before you plan to bake, feed it, and let it sit at room temperature until it’s bubbly and doubled in size. If a recipe specifically calls for “unfed starter” or “discard,” you can use it straight from the fridge.
What should I do with the sourdough starter discard?
Don’t throw it away! Sourdough discard is perfect for making pancakes, waffles, crackers, flatbreads, pizza dough, or even banana bread. Store your discard in a separate container in the refrigerator and use it within a week. There are hundreds of discard recipes online that turn this “waste” into delicious food.
My starter isn’t bubbling after three days. Did I do something wrong?
Probably not. Some starters take longer to show activity, especially in cooler kitchens or with certain types of flour. Keep feeding it once a day and be patient. If you’re still not seeing bubbles by day five, try moving your jar to a warmer spot — the top of the refrigerator is a good option. You can also try using whole wheat or rye flour for a few feedings to give it a boost.
How do I know when my sourdough starter is ready to use?
Your starter is ready when it reliably doubles in size within 4-6 hours of feeding, has a domed top with lots of bubbles, and smells pleasantly sour — like yogurt or fresh bread dough. A simple test: drop a small spoonful of starter into a glass of room temperature water. If it floats, it’s active enough to bake with. If it sinks, give it another day or two of feedings.
Pin This Recipe!

Easy Beginners Sourdough Starter: Best 5-Day Recipe

This foolproof 5-day sourdough starter recipe uses simple ingredients and no special equipment, making it perfect for beginners who want real results without the stress.
- Prep Time: 5 minutes
- Cook Time: 0 minutes
- Total Time: 5 days
- Yield: 1 active sourdough starter 1x
- Category: Starter
- Cuisine: American
Ingredients
- 1/2 cup (60g) whole wheat flour (optional but recommended)
- 1/2 cup (120ml) lukewarm filtered water
- All-purpose flour (about 1 cup or 120g per feeding from Day 2 onward)
- Filtered water (about 1/2 cup or 120ml per feeding from Day 2 onward)
Instructions
- Day 1: Combine 1/2 cup (60g) whole wheat flour and 1/2 cup (120ml) lukewarm filtered water in a clean glass jar. Stir vigorously until no dry flour remains. Scrape down sides, mark height, cover loosely, and place in a warm spot (70-75°F). Let sit undisturbed for 24 hours.
- Day 2: Check starter for bubbles or liquid (hooch). Discard about half. Add 1/2 cup (60g) all-purpose flour and 1/2 cup (120ml) lukewarm filtered water. Stir, scrape, mark height, cover, and return to warm spot. Repeat feeding every 24 hours.
- Day 3: Starter should have bubbles and may double in size. Discard half, feed with 1/2 cup (60g) all-purpose flour and 1/2 cup (120ml) lukewarm water. Stir, scrape, mark, cover, and return. Check 6-8 hours after feeding.
- Day 4: Starter should be noticeably more active, doubling in size within 6-8 hours. Discard half, feed with 1/2 cup (60g) all-purpose flour and 1/2 cup (120ml) lukewarm water. Continue 24-hour feeding schedule.
- Day 5: Starter should double in size within 4-6 hours. Do final feeding: discard half, add 1/2 cup (60g) all-purpose flour and 1/2 cup (120ml) lukewarm water. Wait 4-6 hours. Test readiness by dropping a spoonful into water; if it floats, it’s ready to use.
Notes
Temperature is crucial: keep starter at 70-78°F. Don’t skip discarding; it balances yeast-to-food ratio. Watch for a false rise around Day 2-3. If starter smells like nail polish remover, feed more frequently. If not doubling by Day 5, continue feeding once daily; some starters take 7-10 days.
Nutrition
- Serving Size: 1 tablespoon of star
- Calories: 15
- Carbohydrates: 3
Keywords: sourdough starter, beginner sourdough, easy sourdough starter, 5-day sourdough starter, homemade sourdough starter