I wasn’t planning on making deviled eggs that day. Honestly, I’d stopped by my sister-in-law’s place to drop off a bag of hand-me-down costumes, and I was already mentally planning my escape before her kids could rope me into some elaborate craft project. But then I walked into her kitchen, and the smell hit me—a familiar, tangy, comforting scent of paprika and mustard that cut right through the chaos of glitter glue and fake spider webs. She was standing at the counter, a halved hard-boiled egg in one hand and a piping bag in the other, with a smear of yellow filling on her cheek. I mean, she wasn’t trying to impress anyone. She was just getting dinner on the table before the Halloween parade.
“Don’t just stand there,” she said, nodding toward a bowl of peeled eggs. “Make yourself useful.” So I did. And as I watched her turn those plain white ovals into something that made her kids actually squeal with delight—not at candy, but at a protein-packed snack—I knew I had to figure out how she did it. She used a tiny slice of black olive for the pupil, a dab of red food coloring for the veins, and a casual shrug that said, “It’s nothing.” But let me tell you, it was everything. Maybe you’ve been there, staring at a Pinterest board full of over-the-top Halloween treats that require fondant and food coloring you don’t own. This isn’t that. This is the real, messy, doable version that actually works for a family dinner. And I’ve been making them every October since.
Why You’ll Love This Recipe
Let’s be honest—getting kids to eat protein-packed snacks during the sugar-fueled chaos of Halloween week is like negotiating with tiny, costumed terrorists. But these deviled egg eyeballs? They’re a game-changer. I’ve tested this recipe on my own notoriously picky eaters, my neighbor’s kids (who live on chicken nuggets), and even a few skeptical adults at a potluck. They vanished every single time.
- Quick & Easy: From start to finish, you’re looking at about 30 minutes of active time. The eggs do most of the work while they boil and chill. Perfect for a busy weeknight when you’re also trying to wrestle a tiny vampire into a costume.
- Simple Ingredients: You probably have everything in your fridge right now—eggs, mayo, mustard, paprika, and a few olives. No specialty grocery runs required.
- Perfect for Halloween Fun: These aren’t just snacks; they’re an activity. Kids love helping with the “gory” part (drawing the veins), and they’re always impressed by the creepy result.
- Crowd-Pleaser: I’ve brought these to school parties, office potlucks, and family gatherings. They’re always the first thing to disappear, and I always get asked for the recipe.
- Unbelievably Delicious: The creamy, tangy filling paired with the salty pop of an olive “eyeball” is a combination that works. It’s comfort food with a spooky twist, and honestly, it tastes better than any fancy Halloween dessert I’ve tried.
What makes this version different from the dozens of other deviled egg recipes out there? It’s the texture. I add a tiny splash of pickle juice to the yolk mixture—a trick I picked up from a diner cook in Ohio. It cuts through the richness and gives the filling a brightness that makes you take a second bite. Plus, the “bloodshot” effect using red food coloring is so simple, yet it looks genuinely unsettling. It’s the kind of detail that makes people stop and say, “Wait, how did you do that?”
This recipe isn’t just good—it’s the kind that makes you close your eyes after the first bite. It’s Halloween food reimagined: spooky enough to impress, but simple enough to actually enjoy making.
What Ingredients You Will Need
This recipe uses simple, everyday ingredients to create something that looks genuinely creepy without tasting like a science experiment. Here’s what you’ll need to gather.
For the Deviled Eggs
- 12 large eggs (room temperature works best for even cooking, but cold is fine if you’re in a hurry)
- 1/3 cup mayonnaise (I prefer Hellmann’s for its creamy texture, but any brand works—just avoid the low-fat kind, which can make the filling grainy)
- 1 tablespoon yellow mustard (adds that classic tang; Dijon works too, but it’s a bit sharper)
- 1 teaspoon white vinegar or pickle juice (this is my secret weapon—it brightens the whole filling)
- 1/2 teaspoon smoked paprika (plus extra for garnish; smoked adds a subtle depth that regular paprika doesn’t)
- 1/4 teaspoon salt (adjust to taste, especially if you’re using salted mayo)
- 1/8 teaspoon black pepper
For the “Eyeball” Decoration
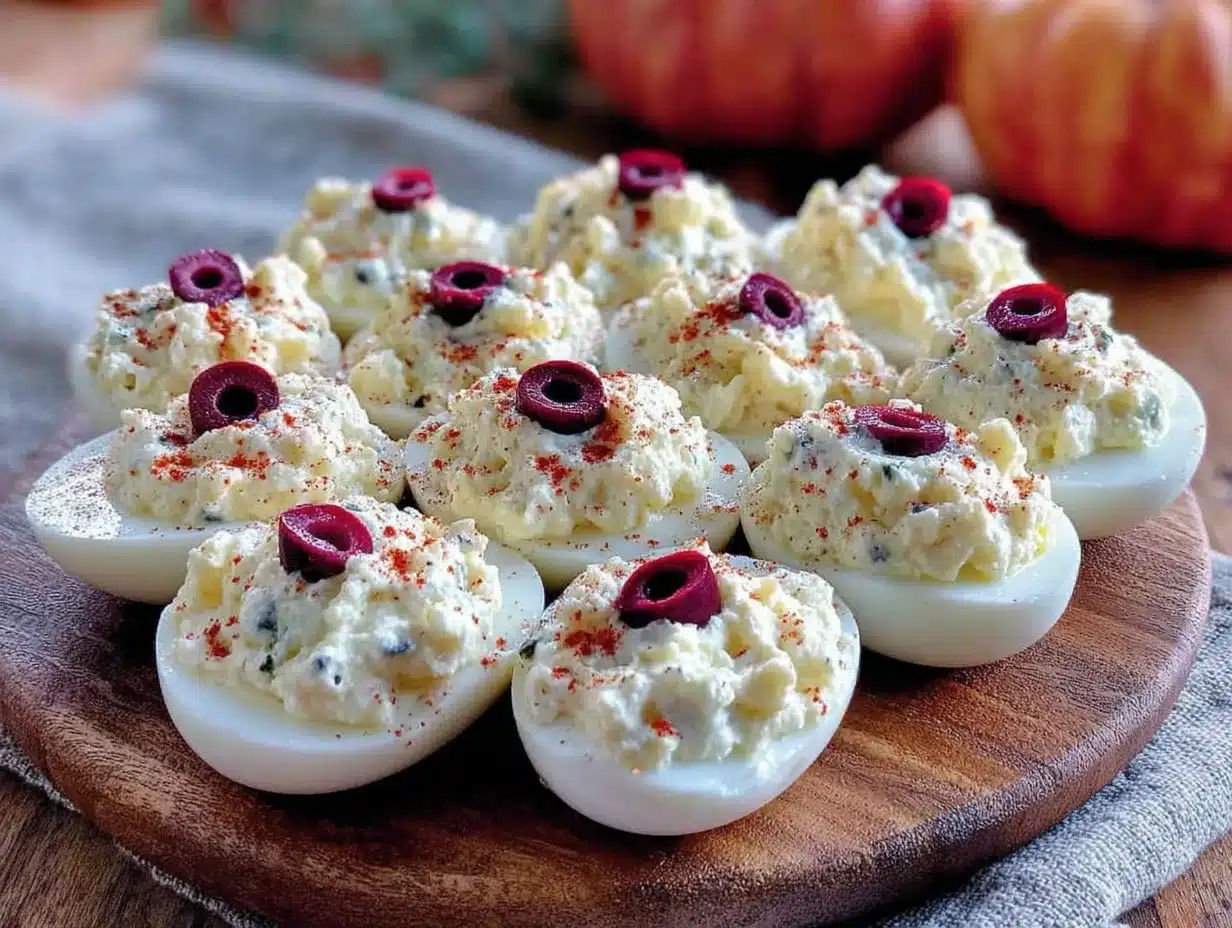
- 1 can (6 oz) large pitted black olives (look for the jumbo size—they’re easier to slice and look more like actual pupils)
- Red food coloring gel (the gel kind is thicker and won’t run; I use Wilton brand, but any concentrated gel works)
- 1 small paintbrush or toothpick (for drawing the “bloodshot” veins—a clean art brush works great)
Ingredient Selection Tips
For the best texture, use eggs that are at least a week old—they peel much easier than farm-fresh eggs. I learned this the hard way after spending 20 minutes picking shell fragments out of a batch of fresh eggs. If you can, grab the olive brand that comes in a can, not a jar; they’re firmer and slice more cleanly. And please, don’t skip the pickle juice. It sounds weird, but it’s the difference between a good deviled egg and a great one.
Substitution Guidance
Need a dairy-free version? Use vegan mayonnaise (I like Follow Your Heart) and skip the pickle juice—use apple cider vinegar instead. For a gluten-free option, you’re already set; just double-check your mustard and mayo labels. If you’re out of smoked paprika, regular sweet paprika works fine, though you’ll lose a bit of that smoky depth. And if olives aren’t your thing, you can use a slice of canned black bean or a tiny piece of roasted red pepper for the pupil—though the olive really does look the most realistic.
Equipment Needed
You don’t need a fancy kitchen to pull these off. Here’s what you’ll need:
- Large saucepan (for boiling the eggs—make sure it’s big enough to hold them in a single layer)
- Mixing bowls (one medium for the yolks, one small for the food coloring)
- Fork or potato masher (for mashing the yolks—a fork works fine, but a masher makes it quicker)
- Piping bag or zip-top bag (a zip-top bag with the corner snipped off works perfectly; no need to buy a fancy piping set)
- Sharp knife and cutting board (for halving the eggs and slicing olives)
- Small paintbrush or toothpick (for the “bloodshot” veins—I use a cheap watercolor brush from the dollar store)
- Slotted spoon (for transferring the eggs from boiling water to ice bath)
If you don’t have a piping bag, honestly, just use a spoon to dollop the filling into the egg whites. It won’t look as polished, but it tastes exactly the same. And if you’re making these with kids, let them use a butter knife to halve the eggs—it’s safer and they’ll feel included.
Preparation Method
Let’s get to the good part. Follow these steps, and you’ll have a platter of creepy eyeballs in no time.
- Hard-boil the eggs. Place the eggs in a single layer in your saucepan and cover them with cold water by about an inch. Bring to a rolling boil over high heat, then cover the pot, turn off the heat, and let them sit for exactly 12 minutes. While they cook, prepare an ice bath—a large bowl filled with ice and cold water. After 12 minutes, use the slotted spoon to transfer the eggs to the ice bath. Let them chill for at least 10 minutes. This shock cooling stops the cooking process and makes peeling a breeze. (Pro tip: Add a teaspoon of baking soda to the boiling water—it raises the pH and makes the shells slide off even easier.)
- Peel the eggs carefully. Gently tap each egg on the counter to crack the shell all over, then roll it between your palms to loosen the membrane. Start peeling from the wider end (where the air pocket is). Rinse under cold water to remove any tiny shell fragments. If you end up with a few ugly eggs, don’t panic—they’re still perfect for the filling. I always buy an extra egg or two just in case. (Warning: If the eggs are too fresh, the shells will stick. That’s okay—just peel under running water.)
- Halve the eggs and remove yolks. Using a sharp knife, slice each egg in half lengthwise. Gently pop out the yolks into your mixing bowl. Arrange the white halves on a serving platter, cut-side up. Try to keep the whites intact—if a few tear, just hide them in the back of the platter. (Personal note: I once dropped a yolk on the floor and had to quickly boil an extra egg. It happens. Just roll with it.)
- Make the filling. Mash the yolks with a fork until they’re crumbly with no large lumps. Add the mayonnaise, mustard, pickle juice (or vinegar), smoked paprika, salt, and pepper. Stir until the mixture is smooth and creamy. Taste it—yes, right now. Adjust the salt or mustard to your liking. The filling should be tangy, creamy, and just a little bit rich. If it seems too thick, add another teaspoon of pickle juice. Too thin? Add a bit more mayo. (Texture cue: It should be spreadable but not runny, like a thick frosting.)
- Fill the egg whites. Spoon the yolk mixture into a piping bag (or a zip-top bag with a corner snipped off). Pipe the filling into each egg white, mounding it slightly above the rim. You want a nice, generous dome—it makes the “eyeball” look more realistic. If you don’t have a bag, just use a teaspoon to dollop the filling in. It’s less tidy, but it still tastes amazing. (Efficiency tip: Fill all the whites before moving on to the decoration step—it’s faster to work assembly-line style.)
- Create the “bloodshot” veins. This is the fun part. Put a small drop of red food coloring gel on a plate. Dip your paintbrush or toothpick into the gel, then carefully draw 3-4 wavy lines from the center of each filled egg toward the edges. Don’t overthink it—real blood vessels aren’t perfect. A few jagged lines look more authentic. Let the gel sit for 30 seconds to set. (Sensory cue: The gel should look glossy and slightly raised, like actual veins.)
- Add the olive pupils. Slice the black olives crosswise into rounds about 1/4-inch thick. You’ll need one slice per egg half. Gently press an olive slice into the center of each filled egg, right over the veins. The olive should sit slightly proud of the filling, creating a 3D eyeball effect. If the olive won’t stick, dab a tiny bit of filling on the back to act as glue. (Personal tip: I like to use the larger olive slices for the “main” eyeballs and smaller ones for the back of the platter—it adds visual variety.)
- Chill and serve. Cover the platter loosely with plastic wrap and refrigerate for at least 30 minutes before serving. This lets the flavors meld and the filling firm up. When you’re ready to serve, sprinkle a light dusting of smoked paprika over the top (optional, but it adds a nice color contrast). Serve cold or at room temperature. (Time note: You can make these up to 24 hours ahead—just keep them covered in the fridge.)
Cooking Tips & Techniques
I’ve made these deviled egg eyeballs at least a dozen times now, and I’ve learned a few things the hard way. Here’s what I wish someone had told me.
The biggest mistake? Overcooking the eggs. If you boil them for more than 12 minutes, the yolks develop a greenish-gray ring and a sulfurous smell. Trust the timer. And please, don’t skip the ice bath—it’s not just for peeling; it stops the cooking immediately.
Another common pitfall is using too much food coloring. A little gel goes a long way. If you use liquid food coloring, it can bleed into the filling and turn everything pink. Stick with gel, and use a light hand. I once made a batch that looked more like a horror movie than a fun snack—my kids loved it, but it was a bit much for the school party.
Timing is everything when you’re making these for a party. I like to boil and peel the eggs the night before, then assemble the filling and decoration the next day. That way, the eggs are fully chilled and the filling stays firm. If you’re multitasking, set a timer for the boiling step—I’ve gotten distracted by a toddler and ended up with rubbery eggs more times than I’d like to admit.
For consistent results, use a kitchen scale to measure the mayo and mustard. I know it sounds fussy, but the ratio of fat to acid is what makes the filling sing. And always taste the filling before you pipe it. Your taste buds are the best tool you have.
One last thing: If you’re making these with kids, let them do the “bloodshot” drawing. It’s messy, it’s imperfect, and they’ll be so proud of their creepy creations. My five-year-old nephew once drew a vein that looked like a smiley face. We called it the “happy eyeball.” It was a hit.
Variations & Adaptations
This recipe is super flexible—here are a few ways to make it your own.
Dietary Variations: For a dairy-free version, use vegan mayo and skip the pickle juice (use apple cider vinegar instead). For a low-carb option, these eggs are already keto-friendly—just watch the mustard, which can have trace sugars. For a whole30 version, use compliant mayo and omit the mustard.
Flavor Twists: Add 1/4 teaspoon of curry powder to the yolk mixture for an earthy, golden twist. Or mix in 1 tablespoon of finely chopped fresh dill for a herbaceous note that pairs beautifully with the olive. I once added a dash of hot sauce to the filling, and it gave the eyeballs a subtle kick that the adults loved.
Seasonal Adaptations: In the fall, swap the smoked paprika for pumpkin pie spice (just a pinch) for a warm, autumnal flavor. In the summer, add a teaspoon of lemon zest to the filling for brightness. For a Christmas version, use green olives with pimento for a festive red-and-green look—though they won’t look as much like eyeballs.
Different Cooking Methods: If you’re short on time, you can use an Instant Pot for the eggs: cook on high pressure for 5 minutes, then quick release and transfer to an ice bath. The shells practically fall off. You can also bake the eggs in a 325°F oven for 30 minutes in a muffin tin—they come out perfectly hard-boiled, though the texture is slightly different.
Personal Variation: My favorite adaptation is adding a tiny pinch of cayenne pepper to the filling. It doesn’t make it spicy—it just adds a warmth that lingers. I also like to use kalamata olives instead of black ones for a more intense, briny flavor. The purple-black color looks even more sinister.
Serving & Storage Suggestions
These deviled egg eyeballs are best served cold or at room temperature, straight from the fridge. Arrange them on a black platter or a dark-colored plate to make the white eggs and red veins pop. For a Halloween party, I like to place them on a bed of fresh kale or spinach—it looks like a creepy, swampy base.
Complementary dishes: Serve these alongside other Halloween finger foods like mummy hot dogs (crescent rolls wrapped around hot dogs with mustard eyes), spiderweb guacamole, or pumpkin-shaped cheese balls. For a drink, a punch bowl filled with “witches’ brew” (limeade with dry ice) is always a hit with kids.
Storage instructions: Leftover deviled eggs can be stored in an airtight container in the refrigerator for up to 3 days. However, the olive slices may soften and the food coloring might bleed a bit over time. For best results, assemble them no more than 24 hours before serving.
Reheating: Do not microwave these—the mayo will separate and the texture will be ruined. If you want to serve them warm, let them sit at room temperature for 15-20 minutes before serving. The flavor actually improves as they come to room temp, as the fats in the mayo soften.
Flavor development: Honestly, these taste better the next day. The flavors meld overnight, and the filling becomes creamier and more cohesive. I often make a double batch on purpose, just so I can have leftovers for lunch the next day. The “eyeballs” might look a little sad after 24 hours, but they taste incredible.
Nutritional Information & Benefits
Here’s a rough estimate per deviled egg half (based on 24 servings):
- Calories: ~65
- Protein: 5g
- Fat: 4.5g
- Carbohydrates: 1g
- Fiber: 0g
- Sugar: 0.5g
These are a great source of high-quality protein and healthy fats from the egg yolks. The olive provides a dose of heart-healthy monounsaturated fats and a touch of iron. The paprika adds a small amount of vitamin A and antioxidants.
Dietary considerations: This recipe is naturally gluten-free, low-carb, and keto-friendly. It’s also vegetarian (though not vegan, due to the eggs and mayo). The main allergens are eggs and mustard—if you have a mustard allergy, simply omit it and add an extra teaspoon of pickle juice for tang.
Personal wellness perspective: I love that this recipe turns a protein-packed snack into something fun and festive. It’s a way to get kids to eat real food during a holiday that’s usually all about sugar. Plus, the act of making them together—drawing the veins, placing the olives—is a great way to spend time as a family. It’s not just food; it’s a memory.
Conclusion
These Kid-Approved Halloween Deviled Egg Eyeballs are the perfect blend of creepy and delicious—a snack that’s as fun to make as it is to eat. They’re proof that you don’t need fancy ingredients or complicated techniques to create something that stops people in their tracks. Whether you’re hosting a Halloween party, packing a school lunch, or just looking for a way to make a Tuesday night feel special, these eyeballs deliver.
I love this recipe because it reminds me of that afternoon in my sister-in-law’s kitchen, standing in a puddle of glitter glue and laughing at her kids’ attempts to draw “scary” veins. It’s not about perfection—it’s about the messy, joyful process of making something together. So go ahead, grab a dozen eggs, and give it a try. Mess up the veins. Use too much paprika. Let the kids take over. I promise, they’ll be the hit of the party.
Have you made these? I’d love to hear how they turned out! Drop a comment below with your favorite variation, or tag me in your photos on social media. And if you’re looking for more spooky snack ideas, check out our Halloween snack board for more inspiration. Happy haunting—and happy eating!
Frequently Asked Questions
Can I make these deviled egg eyeballs ahead of time?
Yes! You can make them up to 24 hours in advance. Just assemble them, cover loosely with plastic wrap, and store in the fridge. The flavors will actually meld and improve overnight. Just be aware that the olive slices may soften slightly over time.
How do I get the eggs to peel easily?
Use eggs that are at least a week old—fresh eggs are notoriously hard to peel. Add a teaspoon of baking soda to the boiling water to raise the pH, and always shock the cooked eggs in an ice bath. Peeling under running cold water also helps remove stubborn shell fragments.
Can I use a different type of olive for the eyeballs?
Absolutely. Kalamata olives give a more intense flavor and a darker color. Green olives with pimento can work for a festive look, though they won’t look as much like realistic eyeballs. If you’re out of olives entirely, a small slice of roasted red pepper or a black bean can substitute.
My filling turned out too runny. How do I fix it?
If your filling is too thin, add a bit more mashed yolk (if you have extra) or a tablespoon of plain breadcrumbs. You can also refrigerate the filling for 15 minutes to firm it up before piping. Next time, use less mayo or pickle juice—start with the smaller amount and add more as needed.
Can I freeze deviled eggs?
I don’t recommend freezing deviled eggs. The mayonnaise-based filling will separate and become watery when thawed, and the egg whites will turn rubbery. These are best made fresh or up to a day ahead. If you have leftovers, keep them in the fridge and eat within 3 days.
Pin This Recipe!

Kid-Approved Halloween Deviled Egg Eyeballs: Easy Spooky Recipe

These spooky deviled egg eyeballs are a fun, protein-packed Halloween snack that kids love. Made with simple ingredients like eggs, mayo, and olives, they’re quick to assemble and perfect for parties or family dinners.
- Prep Time: 30 minutes
- Cook Time: 12 minutes
- Total Time: 1 hour 12 minutes (includes chilling)
- Yield: 24 servings (1 deviled egg half per serving) 1x
- Category: Appetizer
- Cuisine: American
Ingredients
- 12 large eggs (room temperature preferred)
- 1/3 cup mayonnaise (Hellmann’s recommended)
- 1 tablespoon yellow mustard (or Dijon for sharper flavor)
- 1 teaspoon white vinegar or pickle juice
- 1/2 teaspoon smoked paprika (plus extra for garnish)
- 1/4 teaspoon salt (adjust to taste)
- 1/8 teaspoon black pepper
- 1 can (6 oz) large pitted black olives (jumbo size preferred)
- Red food coloring gel (e.g., Wilton brand)
- 1 small paintbrush or toothpick (for drawing veins)
Instructions
- Hard-boil the eggs: Place eggs in a single layer in a saucepan, cover with cold water by 1 inch. Bring to a rolling boil over high heat, cover, turn off heat, and let sit for exactly 12 minutes. Meanwhile, prepare an ice bath. Transfer eggs to ice bath with a slotted spoon and chill for at least 10 minutes.
- Peel the eggs: Gently tap each egg on the counter to crack the shell, roll between palms, and peel starting from the wider end. Rinse under cold water to remove shell fragments.
- Halve the eggs and remove yolks: Slice each egg in half lengthwise with a sharp knife. Gently pop out yolks into a mixing bowl. Arrange egg white halves on a serving platter, cut-side up.
- Make the filling: Mash yolks with a fork until crumbly. Add mayonnaise, mustard, pickle juice (or vinegar), smoked paprika, salt, and pepper. Stir until smooth and creamy. Taste and adjust seasoning as needed.
- Fill the egg whites: Spoon yolk mixture into a piping bag or zip-top bag with a snipped corner. Pipe filling into each egg white, mounding slightly above the rim. Alternatively, use a teaspoon to dollop filling.
- Create the ‘bloodshot’ veins: Place a small drop of red food coloring gel on a plate. Dip a paintbrush or toothpick into the gel and draw 3-4 wavy lines from the center of each filled egg toward the edges. Let set for 30 seconds.
- Add the olive pupils: Slice black olives crosswise into 1/4-inch rounds. Press one olive slice into the center of each filled egg, over the veins. If needed, dab a bit of filling on the back to help it stick.
- Chill and serve: Cover platter loosely with plastic wrap and refrigerate for at least 30 minutes before serving. Optionally, dust with smoked paprika. Serve cold or at room temperature.
Notes
Use eggs at least a week old for easier peeling. Add a teaspoon of baking soda to boiling water to help shells slide off. For dairy-free, use vegan mayonnaise and apple cider vinegar instead of pickle juice. For best results, assemble no more than 24 hours ahead. Leftovers can be stored in an airtight container in the refrigerator for up to 3 days. Do not microwave to reheat; let sit at room temperature for 15-20 minutes instead.
Nutrition
- Serving Size: 1 deviled egg half
- Calories: 65
- Sugar: 0.5
- Sodium: 120
- Fat: 4.5
- Saturated Fat: 1.5
- Carbohydrates: 1
- Protein: 5
Keywords: Halloween deviled eggs, spooky deviled eggs, eyeball deviled eggs, easy Halloween snack, kid-friendly Halloween recipe, deviled egg eyeballs, Halloween appetizer


