Rummaging through the pantry with one eye on the clock and the other on the growing pile of party supplies, I found myself without the usual go-to dessert. Half a box of white cake mix, a few jello packets in patriotic colors, and a vague hope that this would somehow turn into a crowd-pleaser. The kids were buzzing around, impatience hanging in the air thicker than the summer heat, and honestly, the last thing I wanted was a complicated baking marathon. So, with zero time to waste, I poked holes in a freshly baked cake and poured on the jello, layering red, white, and blue like some sort of festive magic trick. Turns out, it was more than just a quick fix; it became the centerpiece of our celebration, sparking compliments and second helpings. The vibrant colors, the fun, jiggly texture, and the sweet, creamy finish all came together in a way that felt like a little victory amid the chaos. This Perfect Red White and Blue Layered Jello Poke Cake isn’t just a dessert — it’s a last-minute rescue that never fails to bring smiles and that quiet, satisfying moment when you realize simple can be spectacular.
Why You’ll Love This Recipe
Honestly, this recipe has become a staple for every holiday bash or casual get-together where a little flair is needed without the fuss. I’ve tweaked and tested it enough times to call it a keeper, and here’s why you’ll want it in your recipe box too:
- Quick & Easy: Coming together in under an hour, it’s perfect for when you’re juggling a million things and need dessert pronto.
- Simple Ingredients: No fancy shopping required—just pantry staples and a handful of jello packets you can easily find year-round.
- Perfect for Celebrations: Whether it’s the Fourth of July, Memorial Day, or any festive occasion, its patriotic layers bring the party vibe instantly.
- Crowd-Pleaser: Kids and adults alike adore the playful layers and the moist, flavorful cake that holds up well even on hot summer days.
- Unbelievably Delicious: The moist texture combined with creamy frosting and the burst of fruity jello flavor creates a nostalgic yet fresh taste experience.
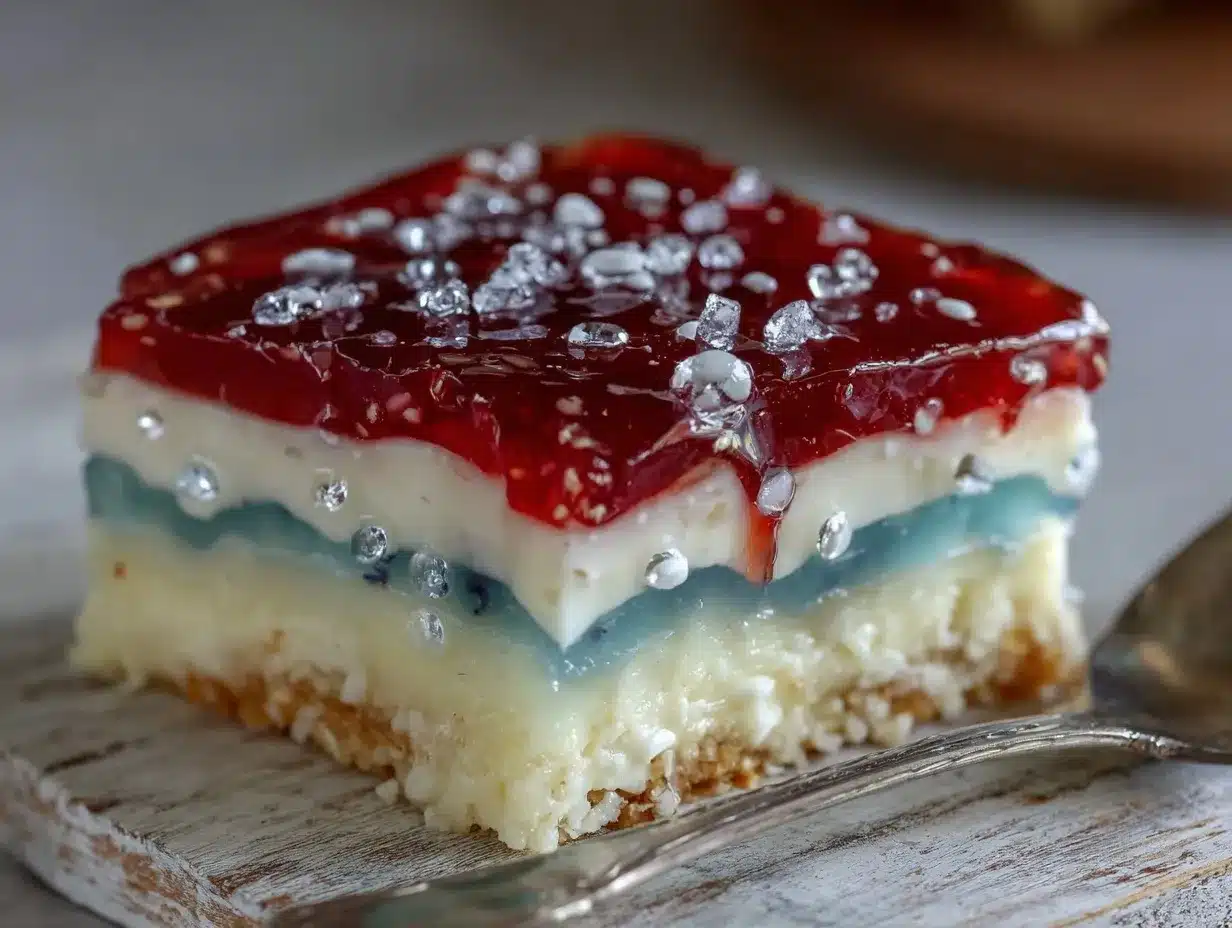
This isn’t just another poke cake. The layering technique gives you a striking red, white, and blue effect that’s Instagram-worthy, but it’s the creamy whipped topping and the perfect balance between sweet and tart that really make it stand out. I remember the first time I served this alongside some fresh fruit popsicles at a neighborhood picnic — the combo was a hit, and honestly, it’s the kind of dessert that makes you pause and savor the moment.
What Ingredients You Will Need
This recipe uses simple, wholesome ingredients to deliver bold flavor and that satisfying, moist texture without fussing over rare or expensive items. Most of these are pantry staples or easy to find in any grocery store, making it super accessible.
- For the Cake:
- 1 box white cake mix (about 15.25 oz / 432 g), plus ingredients listed on the box (usually eggs, oil, and water)
- For the Jello Layers:
- 1 box strawberry or cherry-flavored gelatin (3 oz / 85 g)
- 1 box blueberry or berry blue-flavored gelatin (3 oz / 85 g)
- 1 box unflavored gelatin (1 envelope, about 2 1/2 tsp / 7 g)
- 1 cup boiling water (240 ml) for each jello box
- 1 cup cold water (240 ml) for each jello box
- For the Whipped Topping:
- 1 cup heavy whipping cream (240 ml), chilled
- 1/3 cup powdered sugar (40 g), sifted
- 1 tsp pure vanilla extract (5 ml)
- For Garnish (Optional):
- Fresh strawberries, sliced
- Blueberries
- White chocolate shavings or sprinkles
Pro tip: I always go for the Betty Crocker white cake mix for its reliably tender crumb, and when it comes to jello, the classic brands have that nostalgic flavor that just works perfectly here. If you want to keep it dairy-free, swap the heavy cream with coconut cream—it’s a twist I’ve tried with great results. For a gluten-free version, a gluten-free white cake mix works just fine.
Equipment Needed
- 9×13-inch (23×33 cm) baking pan – a glass or metal pan works well; I prefer glass because it heats evenly and you can see the layers through the sides.
- Mixing bowls – at least two; one for the cake batter and one for the whipped cream.
- Electric mixer or hand whisk – for whipping the cream to soft peaks.
- Measuring cups and spoons – precise measurements help keep the layers distinct.
- Toothpick or fork – to poke the holes evenly in the cake.
- Spatula or spoon – for spreading the whipped topping smoothly.
If you don’t have an electric mixer, a sturdy whisk and some muscle will do the trick for the whipped cream, though it takes a bit more elbow grease. For budget-friendly kitchen setups, a hand whisk and glass baking pan are solid choices that won’t break the bank but still deliver great results.
Preparation Method
- Prepare the Cake Batter: Follow the instructions on the white cake mix box (usually combining the mix with eggs, oil, and water). Preheat your oven to 350°F (175°C). Pour the batter evenly into the greased 9×13-inch pan. Bake for 30-35 minutes, or until a toothpick inserted in the center comes out clean. Let it cool completely on a wire rack. (Cooling fully is key so the jello doesn’t melt.)
- Make the Jello Mixes: Dissolve each jello box separately in 1 cup boiling water, stirring for about 2 minutes until fully dissolved. Then add 1 cup cold water to each and stir. Pour each into separate containers and chill until slightly thickened but still pourable—about 30 minutes. This texture helps the jello set nicely inside the cake.
- Poke the Cake: Use a toothpick or fork to poke holes all over the cooled cake, about 1 inch apart. Be thorough but gentle—you want the holes deep enough to let the jello seep in but not so deep that the cake breaks apart.
- Layer the Jello: Pour the red (strawberry or cherry) jello evenly over half of the cake, letting it seep into the holes. Refrigerate for 15 minutes until set but not fully firm. Next, slowly pour the white layer: mix unflavored gelatin with 1 cup boiling water and 1 cup cold water, then chill until slightly thickened and pour over half the cake. Return to the fridge for another 15 minutes. Finally, pour the blue (berry) jello over the remaining half of the cake and refrigerate for 2 hours or until fully set.
- Whip the Topping: Using an electric mixer, whip the chilled heavy cream with powdered sugar and vanilla until soft peaks form. Spread the whipped cream evenly over the chilled cake, covering all the jello layers.
- Garnish & Serve: Add fresh strawberries, blueberries, or white chocolate shavings on top for a festive look. Slice and serve chilled.
One thing I learned the hard way: rushing the jello pouring stages can cause colors to bleed, so patience makes a prettier cake. Also, letting the cake cool fully before poking keeps it from crumbling. If your first attempt feels a little messy, keep at it—practice makes perfect, especially with layered poke cakes.
Cooking Tips & Techniques
Making a poke cake might sound simple, but getting those distinct red, white, and blue layers takes a little finesse. Here’s what I’ve picked up after a few colorful attempts:
- Chilling Jello to the Right Consistency: The jello should be thick but still pourable when layering. If it’s too liquid, it seeps everywhere; too firm, and it won’t fill the holes properly.
- Poking Evenly: Use a skewer or toothpick and poke holes about an inch apart across the cake. This ensures every bite gets some jello goodness.
- Layer Timing: Don’t wait for each jello layer to fully set before adding the next. Let them gel slightly to prevent colors from mixing but still be sticky enough to bond.
- Whipped Cream Texture: Whip just to soft peaks—overwhipping can make the topping grainy and difficult to spread.
- Keep It Cool: Store the cake in the refrigerator until serving to keep the jello firm and the topping fresh.
One time, I tried to speed things up by skipping the chilling between jello layers — total color swirl disaster. Lesson learned! Also, multitasking kitchen tools are a plus; while the cake bakes, start preparing jello mixes to save some time.
Variations & Adaptations
This red white and blue poke cake is super flexible, so feel free to tweak it to your taste or dietary needs:
- Dairy-Free Version: Swap heavy cream with chilled coconut cream or a dairy-free whipped topping for a creamy finish without dairy.
- Flavor Variations: Use raspberry or watermelon jello for the red layer and lemon or coconut-flavored gelatin for the white layer for a twist on the classic flavors.
- Mini Cakes or Cupcakes: Make individual poke cakes using cupcakes, layering the jello and frosting in mini muffin tins for easy serving.
- Seasonal Adaptation: For summer barbecues, try adding fresh fruit between layers or topping with a fruit glaze to complement the jello flavors.
I once swapped the white layer for a cream cheese glaze to add tang and richness—it was a hit at a family reunion, though a bit messier to slice. For a gluten-free option, a gluten-free white cake mix works beautifully, maintaining all the fun without the gluten.
Serving & Storage Suggestions
This cake is best served chilled, straight from the fridge, to keep the jello layers firm and the whipped topping fresh. Slice with a sharp knife dipped in hot water (wiped dry) to get clean edges without dragging the layers.
Pair it with light, refreshing beverages like a sparkling lemonade punch or fruity iced teas to complement the sweet and tangy flavors. It balances well with savory bites like crispy sweet potato quesadillas or slow cooker BBQ chicken sliders for a full celebration spread.
Store leftovers in an airtight container in the refrigerator for up to 3 days. The flavors actually deepen after a day, but keep in mind the jello might weep slightly over time, so fresh is always best. To re-chill, just pop it back in the fridge for 30 minutes before serving.
Nutritional Information & Benefits
While this cake is definitely a treat, it’s lighter than you might expect thanks to the airy whipped topping and the gelatin’s low calorie count. Here’s an estimate per serving (based on 12 servings):
| Nutrient | Amount |
|---|---|
| Calories | 250-300 kcal |
| Fat | 12-15 g (mostly from whipped cream) |
| Carbohydrates | 35-40 g |
| Protein | 3-4 g |
Gelatin provides a small amount of protein and is known for supporting joint and skin health, while fresh fruit toppings add antioxidants and vitamins. For those monitoring gluten or dairy, swapping ingredients as suggested can keep this recipe friendly without sacrificing flavor. It’s a fun, festive dessert that fits well within a balanced lifestyle when enjoyed in moderation.
Conclusion
This Perfect Red White and Blue Layered Jello Poke Cake recipe really shines when you need a simple, festive dessert that feels homemade without the hassle. I love how customizable it is and how it brings a little sparkle to any celebration, whether last-minute or planned. It’s a recipe that invites you to make it your own, playing with flavors, textures, and presentation.
Honestly, I keep coming back to this poke cake because it reminds me that sometimes, a little creativity and a few pantry staples can create a memorable, joyful moment around the table. If you give this a try, I’d love to hear how you make it your own or what celebration it marked for you. Sharing those stories truly makes the kitchen feel like home.
Frequently Asked Questions
Can I use homemade cake instead of box mix?
Absolutely! A simple white or vanilla sponge cake works great, just make sure it’s fully cooled before poking and layering the jello.
How far in advance can I make this cake?
It’s best made the day before serving to allow the jello layers to set properly and flavors to meld, but no more than 2 days ahead to keep the texture fresh.
Can I make this poke cake without gelatin?
The gelatin is key for the signature poke cake texture and layered effect. You could try using agar-agar as a vegetarian substitute, but the texture and setting time will differ.
What if I don’t have flavored gelatin for the white layer?
The white layer uses unflavored gelatin mixed with water for a neutral, opaque layer that separates the colors. You can add a bit of sweetened condensed milk or cream to the mix for flavor if you want.
How do I prevent the colors from bleeding together?
Chilling each jello layer until slightly firm before adding the next helps keep the colors distinct and prevents blending.
Pin This Recipe!
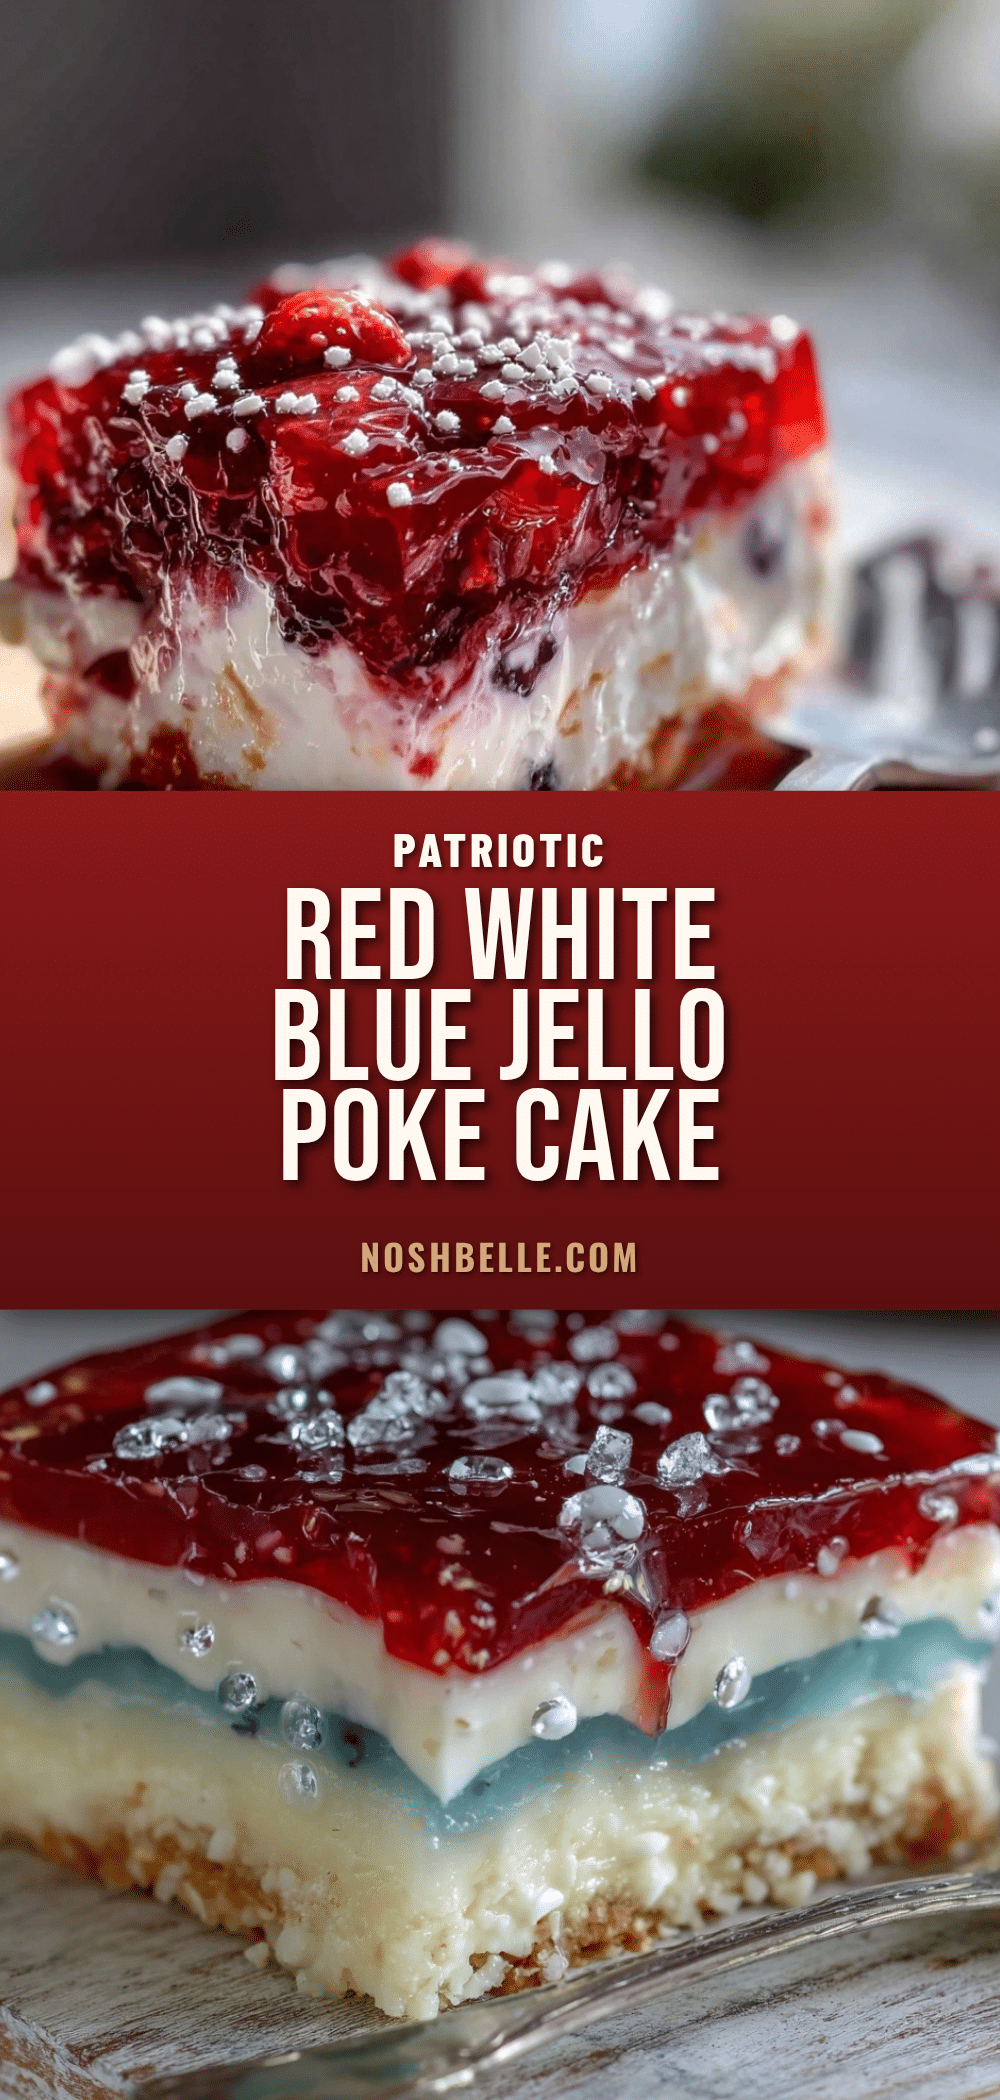
Perfect Red White and Blue Layered Jello Poke Cake

A quick and easy patriotic poke cake featuring layers of red, white, and blue jello poured into a moist white cake and topped with whipped cream. Perfect for celebrations and crowd-pleasing with vibrant colors and a creamy finish.
- Prep Time: 15 minutes
- Cook Time: 35 minutes
- Total Time: 1 hour 15 minutes
- Yield: 12 servings 1x
- Category: Dessert
- Cuisine: American
Ingredients
- 1 box white cake mix (about 15.25 oz / 432 g), plus ingredients listed on the box (usually eggs, oil, and water)
- 1 box strawberry or cherry-flavored gelatin (3 oz / 85 g)
- 1 box blueberry or berry blue-flavored gelatin (3 oz / 85 g)
- 1 box unflavored gelatin (1 envelope, about 2 1/2 tsp / 7 g)
- 1 cup boiling water (240 ml) for each jello box
- 1 cup cold water (240 ml) for each jello box
- 1 cup heavy whipping cream (240 ml), chilled
- 1/3 cup powdered sugar (40 g), sifted
- 1 tsp pure vanilla extract (5 ml)
- Optional garnish: fresh strawberries, sliced
- Optional garnish: blueberries
- Optional garnish: white chocolate shavings or sprinkles
Instructions
- Prepare the Cake Batter: Follow the instructions on the white cake mix box (usually combining the mix with eggs, oil, and water). Preheat your oven to 350°F (175°C). Pour the batter evenly into the greased 9×13-inch pan. Bake for 30-35 minutes, or until a toothpick inserted in the center comes out clean. Let it cool completely on a wire rack.
- Make the Jello Mixes: Dissolve each jello box separately in 1 cup boiling water, stirring for about 2 minutes until fully dissolved. Then add 1 cup cold water to each and stir. Pour each into separate containers and chill until slightly thickened but still pourable—about 30 minutes.
- Poke the Cake: Use a toothpick or fork to poke holes all over the cooled cake, about 1 inch apart. Be thorough but gentle to avoid breaking the cake.
- Layer the Jello: Pour the red (strawberry or cherry) jello evenly over half of the cake, letting it seep into the holes. Refrigerate for 15 minutes until set but not fully firm. Next, slowly pour the white layer (unflavored gelatin mixed with 1 cup boiling water and 1 cup cold water, chilled until slightly thickened) over half the cake. Return to the fridge for another 15 minutes. Finally, pour the blue (berry) jello over the remaining half of the cake and refrigerate for 2 hours or until fully …
- Whip the Topping: Using an electric mixer, whip the chilled heavy cream with powdered sugar and vanilla until soft peaks form. Spread the whipped cream evenly over the chilled cake, covering all the jello layers.
- Garnish & Serve: Add fresh strawberries, blueberries, or white chocolate shavings on top for a festive look. Slice and serve chilled.
Notes
Let the cake cool completely before poking holes to prevent crumbling. Chill each jello layer until slightly thickened but still pourable to avoid color bleeding. Whip cream to soft peaks only to avoid grainy texture. Store cake refrigerated and slice with a knife dipped in hot water for clean edges. For dairy-free, substitute heavy cream with coconut cream. For gluten-free, use gluten-free white cake mix.
Nutrition
- Serving Size: 1 slice (1/12 of cak
- Calories: 275
- Sugar: 28
- Sodium: 250
- Fat: 13.5
- Saturated Fat: 8
- Carbohydrates: 37.5
- Fiber: 0.5
- Protein: 3.5
Keywords: poke cake, jello poke cake, red white and blue dessert, patriotic cake, easy celebration dessert, layered jello cake, quick poke cake